

Microsoft Word Hacks for Young Lawyers: Introduction to Using Styles
This article is brought to you by the Law Society of Singapore’s Legal Research & Development department. It marks the start of a series called “Microsoft Word hacks for young lawyers”. Click here to read the second article in the series.
Introduction
Microsoft Word is a tool of the trade for every lawyer. However, how many lawyers invest time in learning how to use it properly? Just as one invests in honing oral advocacy or drafting skills, young lawyers especially should equally invest time to learn how to use Microsoft Word effectively.
Options for learning Microsoft Word generally fall into two camps: formal learning such as by reading a how-to manual or taking a class on Microsoft Word, and informal learning on the job. While formal learning tends to be more in-depth and comprehensive as compared to informal learning, many Microsoft Word manuals and classes are not tailored for lawyers, and even those that are, need the lawyer to invest time – a scarce resource – to read the manual or take the class.1 As one illustration of the time investment needed to learn Microsoft Word from a manual, the most recent publication on Microsoft Word in the National Library Board’s catalogue (“Word 2019 for dummies” by Dan Gookin) contains 381 pages.

As such, the Law Society’s Legal Research & Development department is launching a new series on “Microsoft Word hacks for young lawyers”. This series curates the Microsoft Word skills most useful for lawyers and presents them in a quick and accessible manner.
The first article in this series focuses on styles. Styles are the single most important feature in Microsoft Word for lawyers.2 Barron Henley, “Dear Lawyers: It’s Not Word, It’s You”, Lawyerist.com (24 June 2016) <https://lawyerist.com/dear-lawyers-not-word/> (accessed 1 March 2019). Drawing on situations that young lawyers are likely to encounter in practice, this article introduces the basics of how to use styles, namely:
- What styles are;
- The benefits of using styles as compared to direct formatting;
- How to apply a style to text;
- How to modify an existing style, either directly or by updating it to match selected text;
- How to link numbering to styles;
- How to create a new style;
- How to set up styles for common needs in legal documents (e.g. bold styles linked to numbers for headings or indented styles for block quotations);
- How to create a table of contents (TOC); and
- How to correctly amend TOC text, and amend TOC formatting at the paragraph and word level.
All references in this article are to Microsoft Word 2016.
What are Styles?
Microsoft Office Support explains that styles are a way to “quickly apply a set of formatting choices consistently throughout your document”.3 Microsoft, “Customize or create new styles in Word”, Microsoft Office Support https://support.office.com/en-us/article/customize-or-create-new-styles-in-word-d38d6e47-f6fc-48eb-a607-1eb120dec563 (accessed 20 February 2019). So if you created a “Heading 1” style and applied it to all the first-level headings in your document, you would be able to change the formatting of every first-level heading with just a few clicks. This is best shown with an example.
1. The benefits of using styles as compared to direct formatting
You are a junior associate who recently joined a boutique litigation firm. The outgoing associate had almost finished writing closing submissions for a concluded trial; you just need to proofread the draft and send it to your partner by tomorrow morning. It’s 11pm, and you hope to leave the office by midnight.
As you start proofreading, you come across a particularly complex argument. You decide to create a new section for it, with a new first-level heading and three new second-level-headings. You type out the new first-level heading and format it as “bold”.
In the example above, the heading has been created through “direct formatting”. That is, the heading has been selected and formatted as “bold”. If you wanted to subsequently change the heading’s formatting to “bold and italic”, for example, you would need to manually select the heading again and format it as “bold and italic”.
There is a better way. If you applied a heading style to that heading and all other headings in the document, you can change the formatting of all the headings by modifying the heading style (see Figure 1).
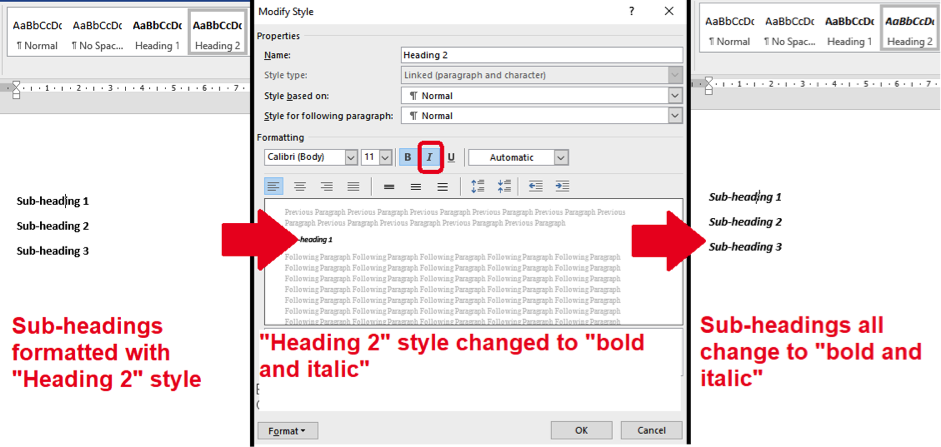
Figure 1: Benefits of styles: Quickly change formatting throughout your document
As styles allow you to quickly change the formatting of all text formatted with that style, they are a powerful tool to ensure consistency in and speed up the formatting of your documents.
2. How to apply a style to text
To apply a style to text, just select the text and then choose a style from the Styles Gallery at the top of your window. (Tip: You can use keyboard shortcuts to apply heading styles – Ctrl-Alt-1 for heading 1, Ctrl-Alt-2 for heading 2, and so on. Just position your cursor in the heading text, then press Ctrl-Alt-1.)
After typing out your first-level-heading, you realise that all the other first-level headings in the submissions have already been formatted using the “Heading 1” style, which the previous associate had formatted as bold. So instead of manually bolding your new first-level heading, you apply the “Heading 1” style to it, and it becomes bold.
3. Modifying an existing style
You feel pleased with how easy it was to apply the “Heading 1” style to your first-level heading. So you type out three new second-level headings and apply the “Heading 2” style to them. However, unlike the “Heading 1” style which the previous associate had formatted as bold, the “Heading 2” style is still set as Microsoft Word’s default style: blue size-13 font. Your second-level headings are now blue and in size-13, which is clearly not suitable for your document.
Microsoft Word’s default styles (see Figure 2 below) may not be suitable for legal documents. If you apply Microsoft Word’s default heading styles to your document’s headings, you’ll likely want to modify them to suit your document’s formatting first.

Figure 2: The Styles gallery shows Microsoft Word’s default styles
3.1. Modifying an existing style using “Update to match selection”
The quickest way to modify a style is to select text that is formatted the way you want, right-click the existing style, and choose “Update [style] to match selection” (see Figure 3 below).
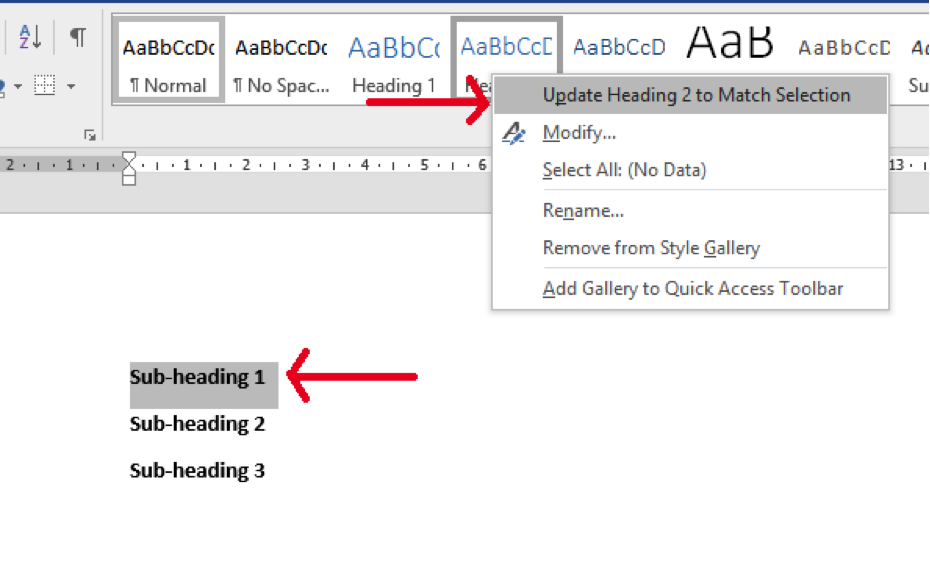
Figure 3: “Update style to match selection” will change the “Heading 2” style to match the selected text
3.2. Modifying an existing style directly
You can also modify an existing style directly by right-clicking it and choosing “Modify”. You can then specify the formatting you want (see Figure 4 below). If you are modifying Microsoft Word’s default heading styles, you will likely need to change the font, font size and font colour, as well as add your desired bold, italic or underline formatting for your heading.

Figure 4: The “Modify style” window lets you change the style’s font, font size, font colour, and bold/italic/underline, among other options
4. Linking numbering to styles
You’ve finished creating the new first-level heading and three new second-level headings. But your firm’s formatting guide specifies that first-level headings should be numbered, and you forgot to number your new first-level heading. You scroll up to check the previous first-level heading, which has the number “3”. So you type “4.” in front of your new first-level heading and hit “Enter” behind it to add the number.
Two commonly-used methods to create numbered lists are:
- Typing “1.” in front of the first item, then hitting “Enter” (as described above), and
- Selecting text, then clicking the “Numbering” button on the ribbon (as shown in Figure 5 below).
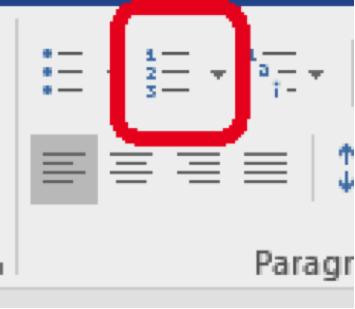
Figure 5: Microsoft Word’s “Numbering” button
While simple to use, neither of these automatic numbering methods are ideal in complex documents. Commentators have described Word’s auto-numbering as “difficult to understand”,4 John McGhie, “The Word MVP Site: Word’s numbering explained” <https://wordmvp.com/FAQs/Numbering/WordsNumberingExplained.htm> (accessed 28 February 2019). “difficult to customise … to your preferences”,5 Deborah Savadra, “Numbering in Microsoft Word”, Lawyerist.com (updated 11 January 2018) <https://lawyerist.com/technology/microsoft-office/word/numbering/> (accessed 21 February 2019). and “broken”.6 Charles Kyle Kenyon, “Automatic Numbering in Microsoft Word”, <http://www.addbalance.com/usersguide/numbering.htm> (accessed 28 February 2019). It is beyond the scope of this article to discuss how to properly use Microsoft Word’s automatic numbering, given that entire guides have been written on this topic alone.7 See for example Deborah Savadra, supra n 3; and Charles Kyle Kenyon, ibid. However, Figure 6 below illustrates one potential problem with using automatic numbering.
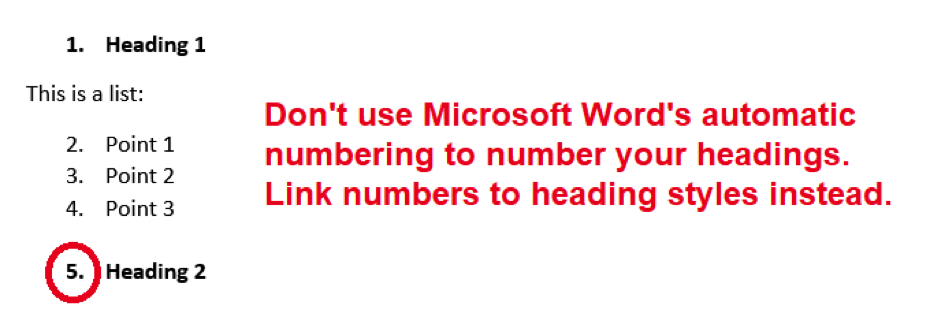
Figure 6: Problems that may result from Microsoft Word’s automatic numbering
A better option is to use numbers linked to styles. To add numbers to a style, right-click the style and choose Modify style > Format > Numbering (see Figure 7 below). For headings, adding numbers to the heading style rather than using automatic numbering avoids the risk of heading numbers “merging” with other automatically-numbered lists in your document.
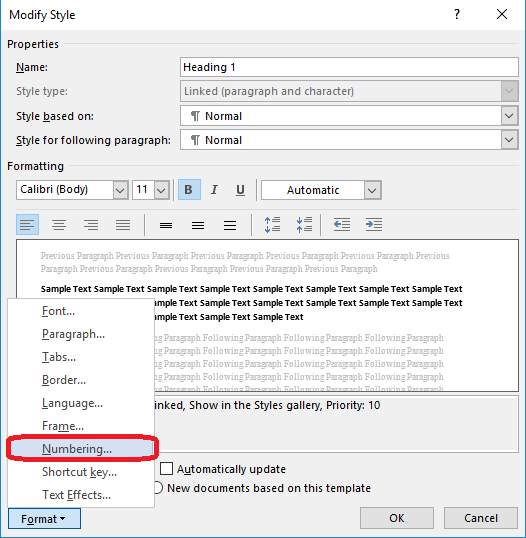
Figure 7: How to add numbers to a heading style
5. Creating a new style
As you continue proofreading, you notice that the block quotations in the submissions are indented differently from what the firm’s formatting guide specifies. Your heart sinks. Do you really have to find every block quotation in the document and change the indents one by one?
A faster way to standardise the indents would be to create a new “Block Quotations” style, apply it to all block quotations and modify the paragraph indents for this style. As noted above in “The benefits of using styles”, this will let you set the indents for all block quotations at once just by modifying the “Block Quotations” style.
To create a new style, go to Home > Styles > Styles pane (click the arrow on the bottom right corner of the Styles gallery) > New style (see Figure 8 below).
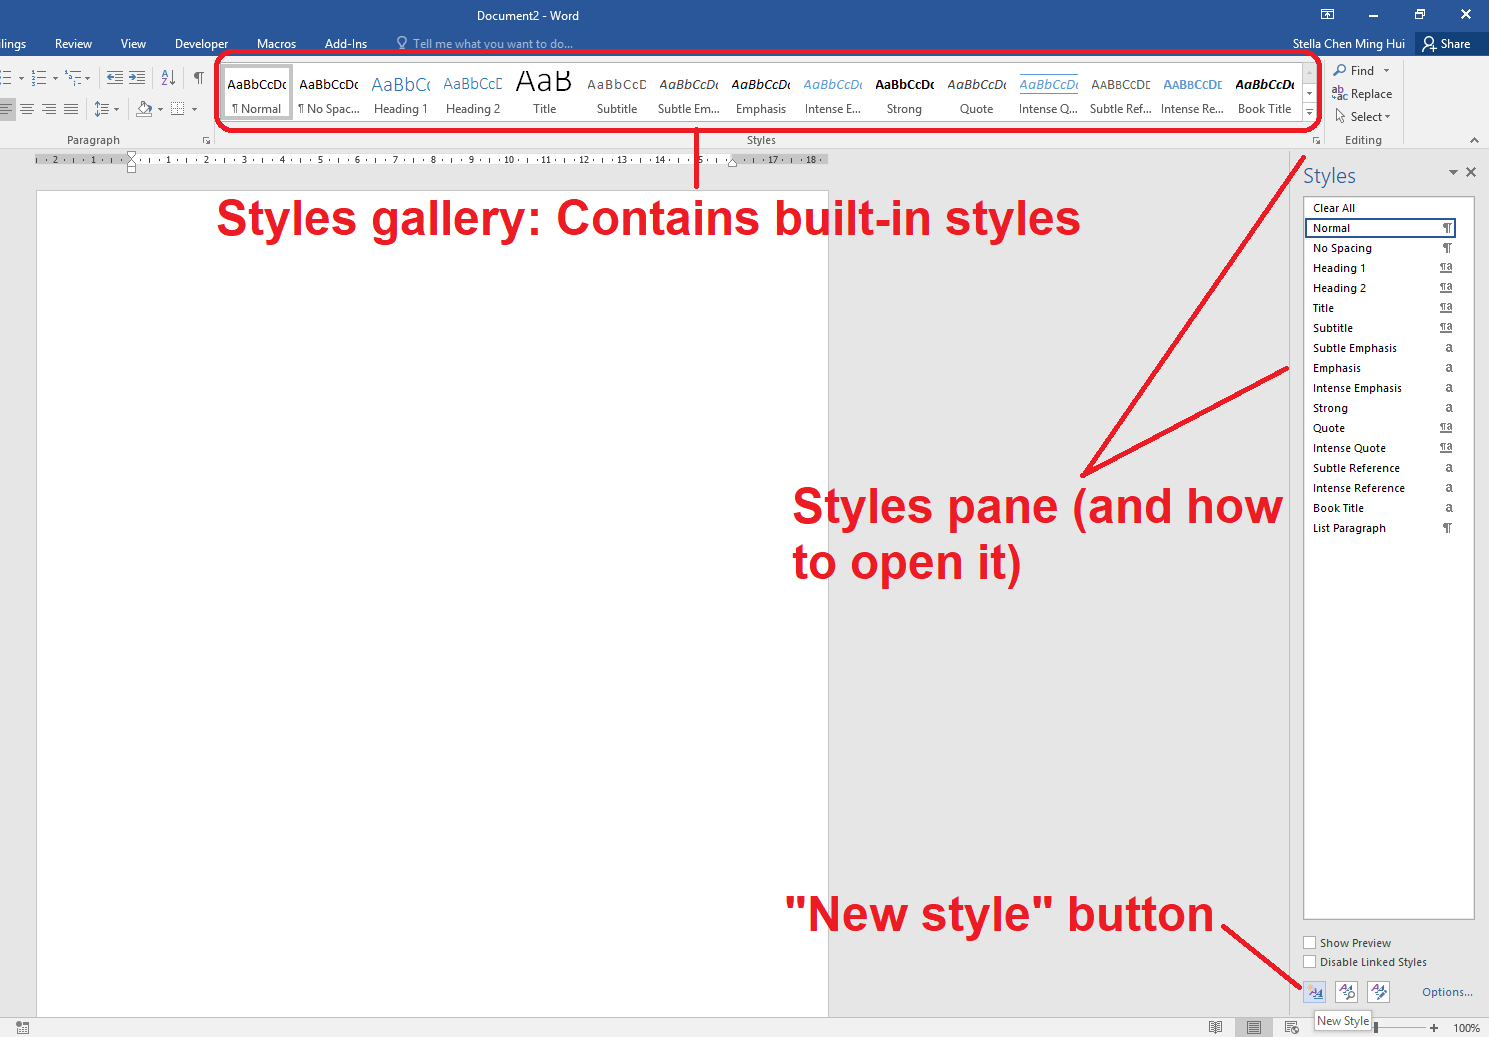
Figure 8: Open the Styles pane to create a new style
To set the indents, go to Format > Paragraphs > Set indent (see Figure 9 below).
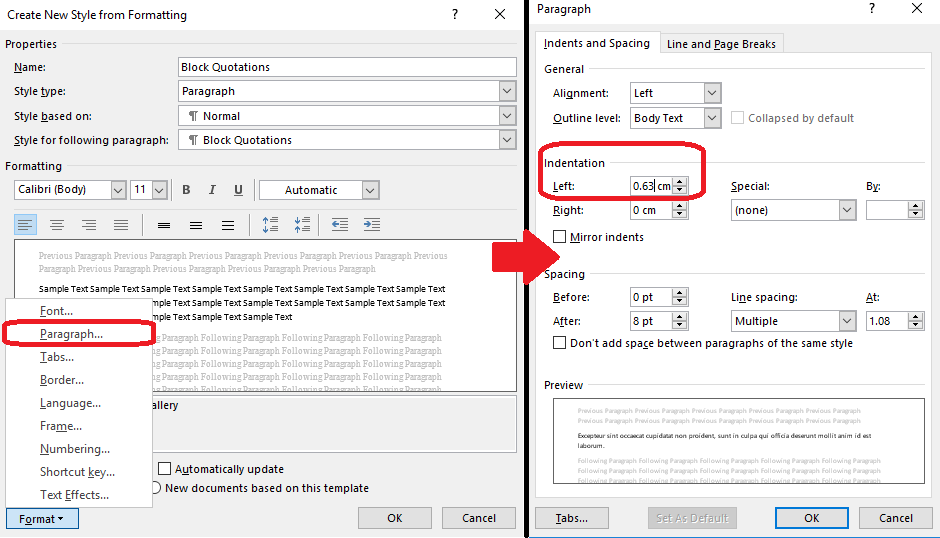
Figure 9: Adjusting indents of the “Block Quotations” style
Now go through your document and apply the “Block Quotations” style to all block quotations. If you want to make further formatting changes (e.g. adding a right indent or italics), you can do so quickly by modifying the “Block Quotations” style.
You create a new style called “Block Quotations”. You still have to go through the document to find all block quotations and apply the “Block Quotations” style to them. But once you’ve done that, you can change the indents for all block quotations at once by changing the indents of the “Block Quotations” style.
6. Creating a table of contents
Having finished proofreading, you now need to add a table of contents to the submissions. You’ve created TOCs a few times before at your previous firm and vaguely recall how to do it. But it’s now approaching midnight and you cross your fingers that nothing will go wrong with the TOC, because you don’t have time to fix it.
TOCs are generated from the heading styles used in your document. By default, a TOC will include the top 3 heading levels, i.e. all text formatted using the styles “Heading 1” to “Heading 3”. This is another reason why you should use heading styles – otherwise, you cannot generate a TOC.
If you need to generate a TOC for a document that does not use heading styles, first go through the document and apply heading styles to all the headings. Once this is done, creating a TOC is straightforward. Go to References > Table of Contents and insert a table of contents (see Figure 10 below).
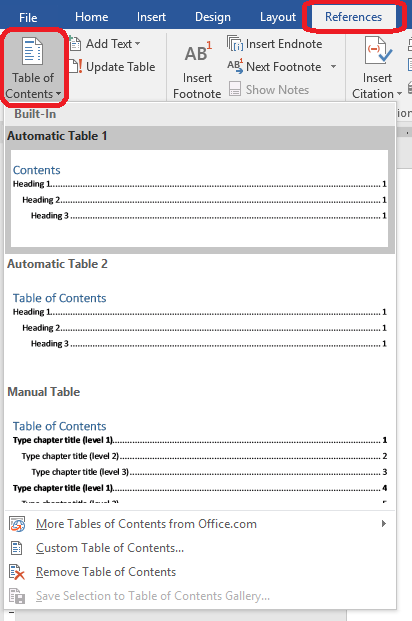
Figure 10: How to add a table of contents
You know that to generate a TOC from headings, all headings must be formatted with a heading style. The previous associate had already formatted all the first-level headings with the “Heading 1” style. You go through the document to apply the “Heading 2” style to all the second-level headings. Once you’re done, you easily generate a TOC using References > Table of Contents.
7. Amending a TOC
You immediately notice a typo on the first page of the TOC and correct it there. You also see that your TOC does not match the formatting of the headings used in your document as the document’s headings are all in bold, but your TOC headings are not. So you select the whole TOC and format it as bold.
You check through the document one last time, make a final few edits, then click the TOC and choose “Update entire table”. To your horror, the typo reappears and the TOC is no longer in bold.
7.1. Amending TOC text
Whether you need to amend text or formatting, you should never amend directly on the TOC itself.
If you need to amend text, amend the relevant heading in your document and not the TOC text (see Figure 11 below). Because the TOC is generated based on the headings in your document, any changes made directly on the TOC will be lost when the TOC is next updated.
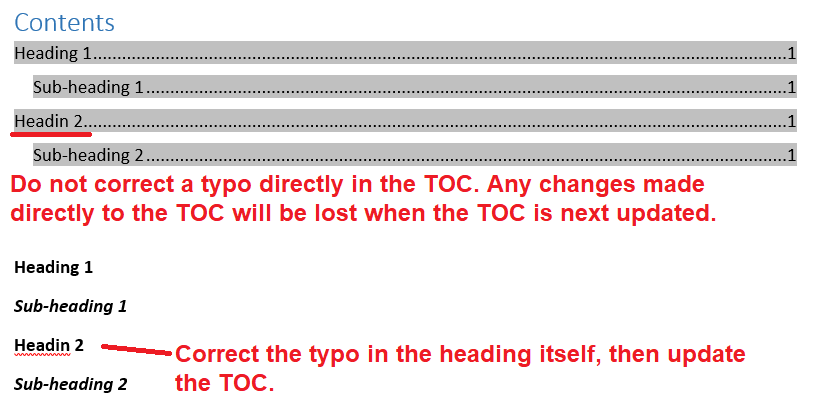
Figure 11: The correct way to fix typos in your TOC
Similarly, if you have corrected a typo in a heading in your document, you need to “Update the entire table” before the TOC will show your corrected text.
The quickest way to update your TOC is to press Ctrl-A-F9. (This will update the whole TOC, not only its page numbers, and also update all fields in your document.)
7.2. Amending TOC formatting
How you amend TOC formatting depends on whether you need to format an entire paragraph or just a few words. If you need to format entire paragraphs, e.g. changing all your first-level TOC headings from the default font to bold, you should not format the TOC directly, but modify the TOC styles instead.
Go to Home > Styles and open the Styles pane. You should see the styles “TOC 1”, “TOC 2” etc., based on how many levels you have in your TOC (see Figure 12 below).
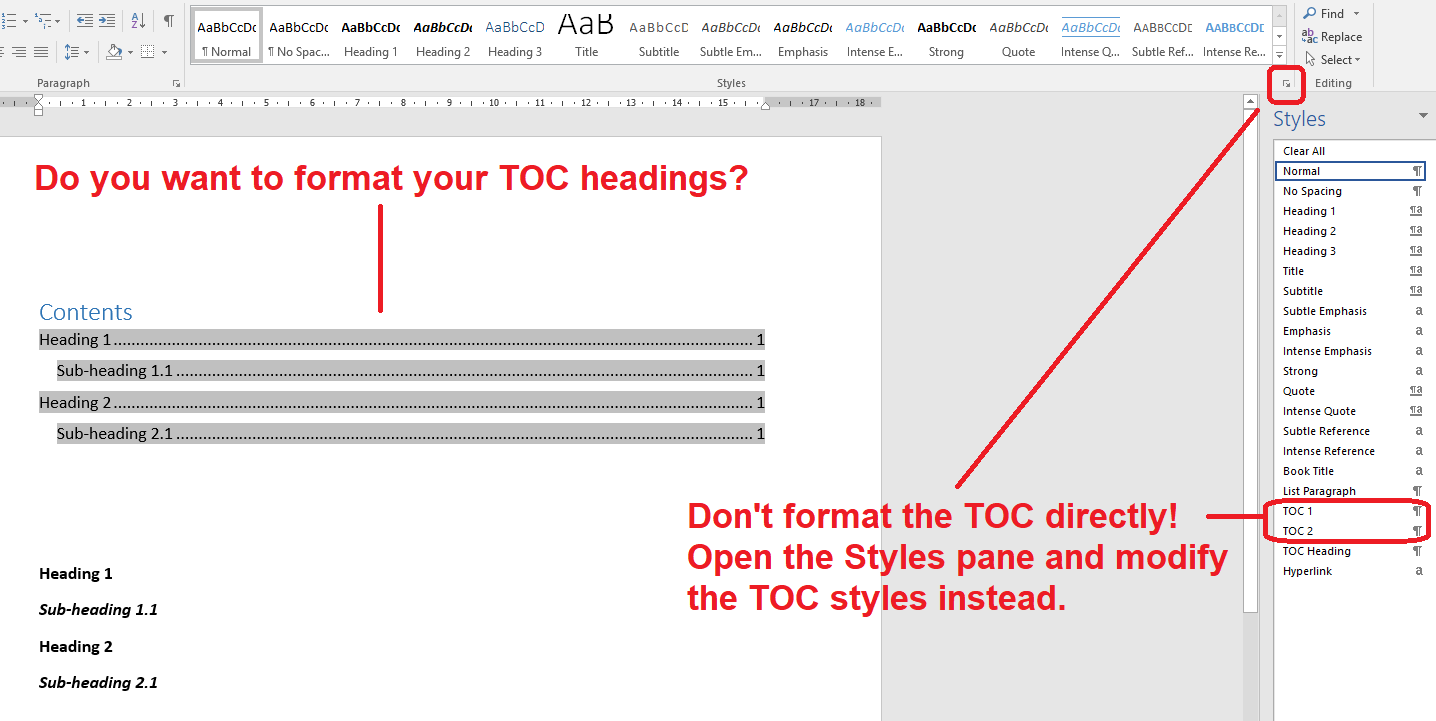
Figure 12: How to correctly format your TOC headings using the Styles pane
TOC heading styles are different from the heading styles you use in your document. That is, your first-level TOC heading does not copy the formatting of your “Heading 1” style. In Figure 12 above, if you wanted the first-level TOC heading to match the formatting of “Heading 1”, you would need to modify the “TOC 1” style to “Bold”.
What if you only wanted to format a few words in your TOC? E.g. to bold the word “not” in the sentence “The case law does not support proposition X.” By now, you can guess that you should not format text in the TOC directly. Instead, format the words in the relevant heading in your document (see the instructions on “Amending TOC text” above) and update the TOC to reflect the formatting change.
You realise you were trying to amend the TOC the wrong way. To fix the typo, you click on the TOC heading with the typo, go to that heading in your document, and fix the typo there. To bold your first- and second-level TOC headings, you open the Styles pane, right-click the “TOC 1” and “TOC 2” styles and modify them to make them bold. You press Ctrl-A-F9 to update the whole TOC again. This time, the typo does not reappear and the TOC stays formatted as bold.
Having finished the proofreading, you submit your document to your partner and leave by midnight as planned – thanks to your knowledge of and efficient use of styles.
If you enjoyed this article, look out for more articles from the “Microsoft Word hacks for young lawyers” series later this year from the Law Society of Singapore’s Legal Research & Development department. Click here to read the second article in the series.
To share ideas on what you would like to see covered in the “Microsoft Word hacks” series, drop us an e-mail at [email protected].
Endnotes
| ↑1 | As one illustration of the time investment needed to learn Microsoft Word from a manual, the most recent publication on Microsoft Word in the National Library Board’s catalogue (“Word 2019 for dummies” by Dan Gookin) contains 381 pages. |
|---|---|
| ↑2 | Barron Henley, “Dear Lawyers: It’s Not Word, It’s You”, Lawyerist.com (24 June 2016) <https://lawyerist.com/dear-lawyers-not-word/> (accessed 1 March 2019). |
| ↑3 | Microsoft, “Customize or create new styles in Word”, Microsoft Office Support https://support.office.com/en-us/article/customize-or-create-new-styles-in-word-d38d6e47-f6fc-48eb-a607-1eb120dec563 (accessed 20 February 2019). |
| ↑4 | John McGhie, “The Word MVP Site: Word’s numbering explained” <https://wordmvp.com/FAQs/Numbering/WordsNumberingExplained.htm> (accessed 28 February 2019). |
| ↑5 | Deborah Savadra, “Numbering in Microsoft Word”, Lawyerist.com (updated 11 January 2018) <https://lawyerist.com/technology/microsoft-office/word/numbering/> (accessed 21 February 2019). |
| ↑6 | Charles Kyle Kenyon, “Automatic Numbering in Microsoft Word”, <http://www.addbalance.com/usersguide/numbering.htm> (accessed 28 February 2019). |
| ↑7 | See for example Deborah Savadra, supra n 3; and Charles Kyle Kenyon, ibid. |