

Microsoft Word Proofreading Hacks
Complete this sentence: Proofreading is the b___ of every young lawyer’s existence. (The bread and butter, obviously.) Given how much proofreading you do over the course of a legal career, it makes sense to learn how to proofread smarter, better and faster. What if I told you that Microsoft Word already has many nifty features to help you do just that?
In this article I’ll discuss ways you can clear formatting, understand formatting problems, prevent future problems, and use Find and Replace to speed up your proofreading. As a bonus, I’ll also cover two things you might want to do after proofreading, before sending your document to someone else.
Many of these tips assume you know how to use styles and automatic cross-references. If not, check out these two previous articles I’ve written on Microsoft Word, namely:

- Microsoft Word hacks for young lawyers: Introduction to using styles
- Microsoft Word hacks for young lawyers: How to automate your cross-references
Here’s an overview of what this article covers.
1. Fix formatting in 5s: How to remove formatting
2. Understand your formatting problems with “Reveal formatting”
3. Avoid documents suddenly changing when you print or save as PDF: Update your fields
4. Search for cross-references to check them quickly
5. Search for (and remove) highlighted text
6. Avoid future formatting inconsistencies: Replace section breaks with page breaks
8. Bonus: Clean up confidential metadata when you’re done with your document
9. Bonus: Lock “track changes” to be always on
Fix Formatting in 5s: How to Remove Formatting
We start with the eponymous 5-second fix. Sometimes your formatting is so hopeless that you want to strip off all the formatting and start again. These four methods1I first learned of these methods via Deborah Savadras’ very helpful site on Word tips for lawyers, at https://legalofficeguru.com/4-fastest-formatting-fixes-i-know/. will help you do just that.
“Clear all formatting”
This clears all formatting from your text (who could have guessed?) Just select the text, then click this button in the Home tab as seen in Figure 1 below.
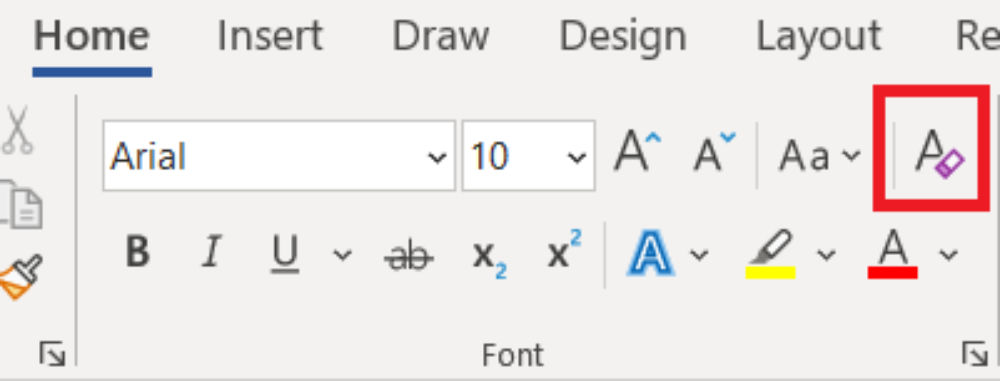
Figure 1 Location of “Clear all formatting” button
Here’s a before and after of the “Clear all formatting” results in Figure 2 below. Note that it cleared both the individual word’s formatting (the bold of “consectetur”) and the whole paragraph’s formatting (the wider line spacing).

Figure 2 Before and after “Clear all formatting”, underline shows cursor position
“Clear all formatting” is the most drastic of the four methods.
Apply “Normal” style via Ctrl-Shift-N
“Normal” is the style which unformatted text usually has. If you open a new document and start typing, you will see that the text has the “Normal” style (like in Figure 3 below). So “apply Normal style” is like resetting your text formatting to the kind that new unformatted text has.

Figure 3 You can see from the Styles Gallery that new text usually has “Normal” style
Here’s another before and after example in Figure 4 below. Notice that “Apply Normal style” removes the too-wide paragraph spacing from the first paragraph.
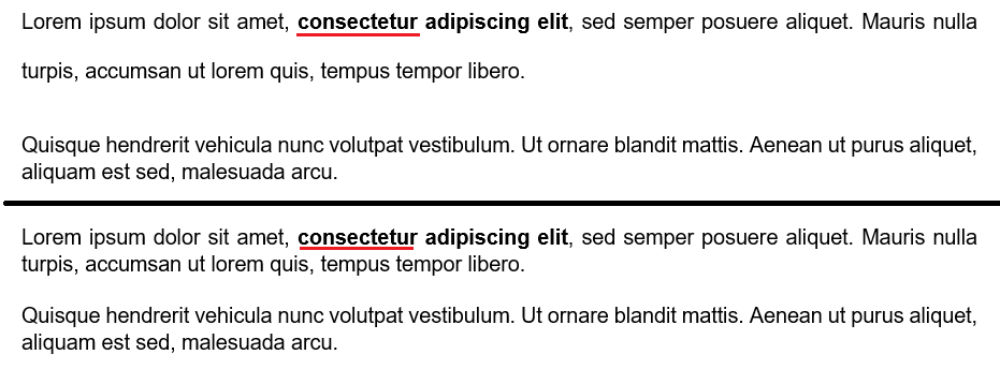
Figure 4 Before and after “apply Normal style”, underline shows cursor position
Why didn’t it remove the bold from “consectetur”? “Apply Normal style” guessed that I intentionally bolded a few words for emphasis because only a few words in the paragraph were bolded, so it did not remove the formatting. If I had bolded more than half the paragraph, “Apply Normal style” would remove all the bold formatting too.2On how Normal style clears direct formatting that takes up more than half a paragraph https://shaunakelly.com/word/styles/stylesoverridedirectformatting.html So “Apply Normal style” may or may not remove formatting from individual words, depending on how much of the paragraph shares that formatting.
You can apply Normal style via clicking in the Styles Gallery (in Figure 3 above) or using the keyboard shortcut Ctrl-Shift-N. Here are some real-life examples in Figure 5 and Figure 6 of when it’s useful.
Figure 5 “Apply Normal style” removes the unnecessary clause nos and bold
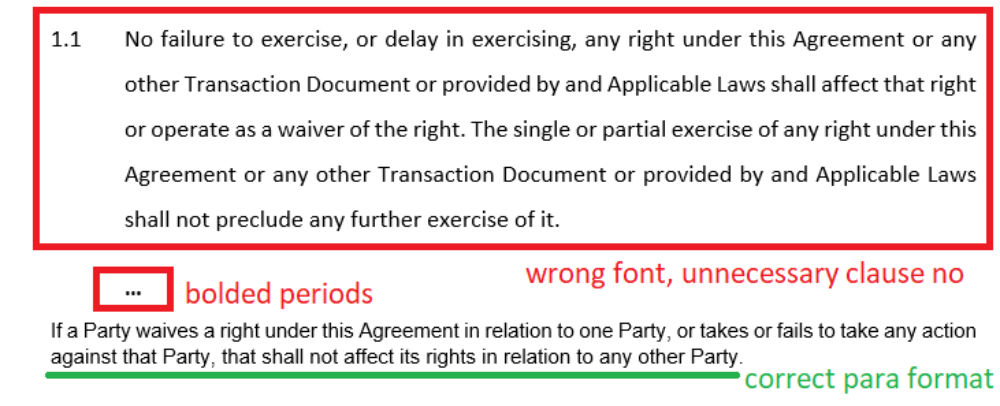
Figure 6 “Apply Normal style” will make the wrongly-formatted paras match the correct one
“Apply Normal style” may give the same result as “Clear all formatting”, or remove less formatting, depending on the situation. But the real difference to me is that its keyboard shortcut, Ctrl-Shift-N, is much more convenient than clicking a button. I use “Apply Normal style” almost every day.
Remove paragraph formatting via Ctrl-Q
This method removes only paragraph-level formatting, meaning any formatting that can apply only to a whole paragraph. E.g. line spacing or paragraph indentation, which cannot be applied to only a few words in a paragraph – the whole paragraph must have the same line spacing and indentation.
Again, a before and after example to illustrate in Figure 7 below:
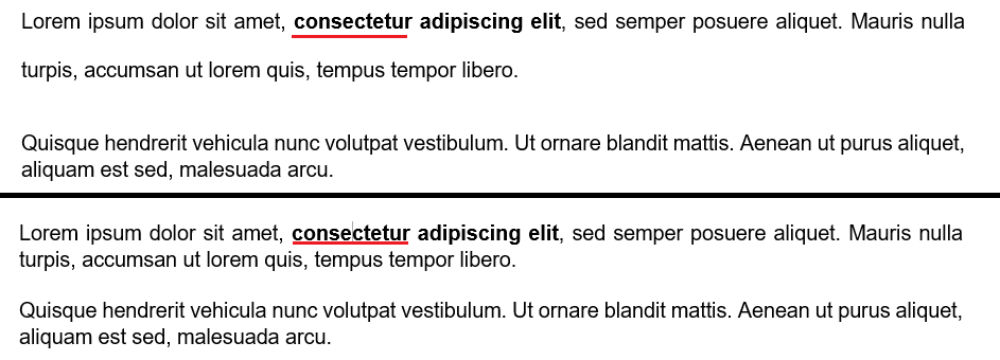
Figure 7 Before and after “remove paragraph formatting”, underline shows cursor position
You see that the bold is retained while the too-wide line spacing is removed. (In this specific case it looks the same as the result for “Apply Normal style” in Figure 4 above, though these two methods are not the same.)
The keyboard shortcut is Ctrl-Q. “Remove paragraph formatting” is most helpful when you need to clean up formatting while keeping the formatting of some words (e.g. emphasised words or italicised case names).
Remove character formatting via Ctrl-Space
This is the converse of “remove paragraph formatting”. This method removes only character-level formatting, meaning any formatting that can apply to individual words. Examples include bold, font size and highlighting, which can all be limited to apply to only one word.
The before/after example again in Figure 8 below:
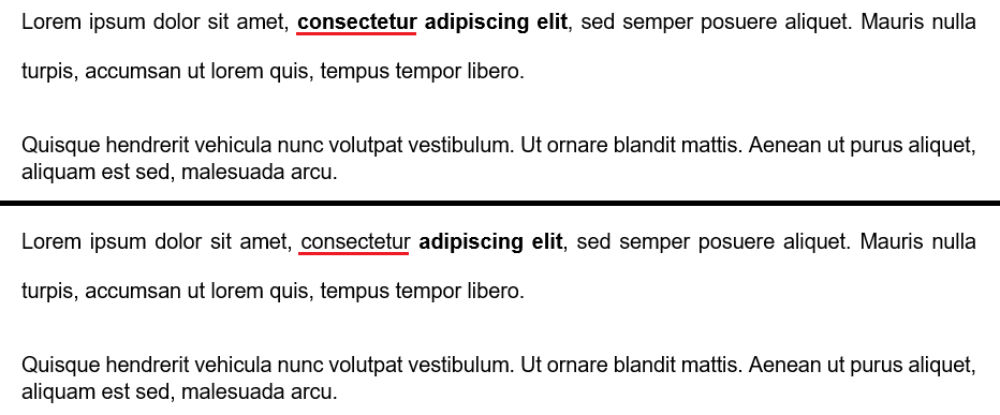
Figure 8 Before and after “remove character formatting”, underline shows cursor position
Pressing Ctrl-Space removes the bold formatting, which is character-level, while leaving the too-wide paragraph-level line spacing.
“Remove character formatting” is most useful when you only need to clear the formatting of specific words, e.g. text which is red and highlighted. Coincidentally two good real-life examples cropped up while I was in the process of writing this article.
For example, “remove character formatting” would quickly remove the orange underlined font from the address in Figure 9 below. Unlike the other three methods, “remove character formatting” will retain the paragraph number “1”. Just select all the orange text, then use Ctrl-Space.

Figure 9 An obvious case where “remove character formatting” helps
Another less-obvious case where it would help is shown in Figure 10 below. Clause 2 is the correct formatting, whereas something about clause 1 looks different – a different font? But both clauses use Times 12 font. It’s not the paragraph justification either.

Figure 10 “Remove character formatting” will make clause 1 look like clause 2
Using “Reveal formatting” (discussed in the next tip) would tell you that the problem lies in a little-known property called “character spacing”, i.e clause 1’s character spacing is wider than clause 2’s. But in fact, you don’t need to know that. The four methods in this tip work whether or not you know where the problem lies – just try one of them, and if it doesn’t work, undo and try the next one. So if you’d tried all four methods to fix clause 1’s formatting above, you’d find that only “remove character formatting” fixes the problem while retaining the clause number “1”.
Summary of the four methods
“Clear all formatting” and “apply Normal style” remove the most formatting, while “remove paragraph formatting” and “remove character formatting” let you remove some formatting while keeping formatting like emphasised words or paragraph numbers respectively. Try them out and you’ll soon learn which situations each is most useful.
| How to use | What it does |
|---|---|
| “Clear all formatting” button (in Home tab)
|
Clears all formatting |
| Ctrl-Shift-N (apply Normal style) | Applies “Normal” style – unformatted text usually has this style |
| Ctrl-Q (remove paragraph formatting) | Removes only paragraph-level formatting, i.e. any formatting that can apply only at the paragraph level
E.g. removes line spacing, paragraph indentation |
| Ctrl-Space (remove character formatting) | Removes only character-level formatting i.e. any formatting that can apply to individual words
E.g. removes bold, underline, highlight, font size |
Understand Your Formatting Problems with “Reveal Formatting”
While the earlier four methods say “fix it now”, this tip asks your formatting problem to “tell me more”. “Reveal formatting” lets you examine your problem text in detail to identify the issue. To use it:
- Put your cursor inside the word or paragraph you want to check.
- Press Shift-F1. (You can also use a button but that needs many more steps to access.3How to open “Reveal formatting” using a (hard to access) button https://www.teachucomp.com/reveal-formatting-in-word-instructions/)
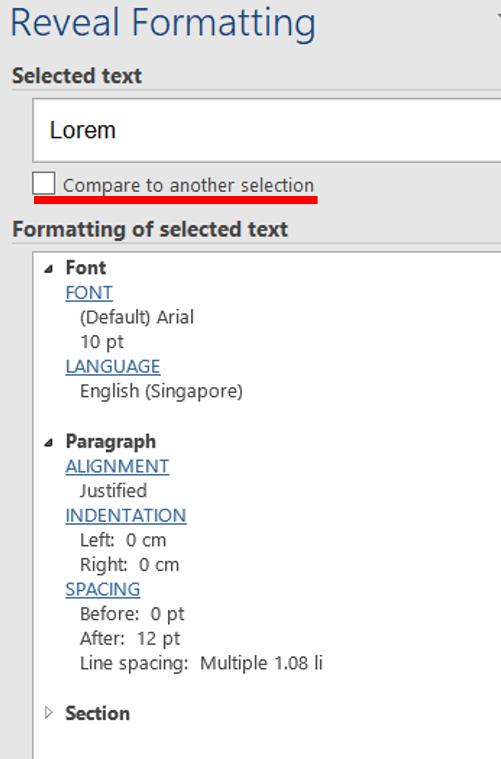
Figure 11 Information which Shift-F1 gives you. Note that it can compare texts!
As seen in Figure 11 above, Shift-F1 gives you detailed information on your text’s formatting. Sometimes this may be all you need to know, e.g. Shift-F1 shows that one paragraph uses 1.08 line spacing instead of the correct single-line spacing.
However Shift-F1’s real power lies in letting you compare two texts’ formatting. Say you have these two paragraphs below and don’t know how to make their formatting the same. (Assume Format Painter and the methods in tip 1 above didn’t work.)

Figure 12 How would you identify what makes these two paras different?
Here’s how to use Shift-F1 to compare them:
- Put cursor in first paragraph and press Shift-F1.
- Tick “Compare to another selection”.
- Put cursor in second paragraph.
You’d then see this screen:
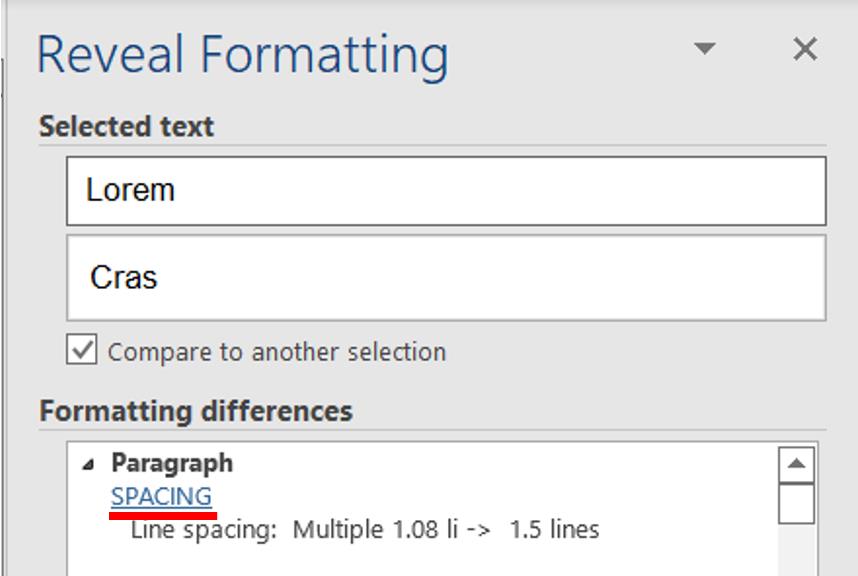
Figure 13 The Shift-F1 compare results show any formatting differences, click the links to correct these differences
We see immediately that the two paras have different line spacing. Conveniently, you can click the “Spacing” hyperlink to go straight to the Line Spacing dialog box and change the spacing so that they match.
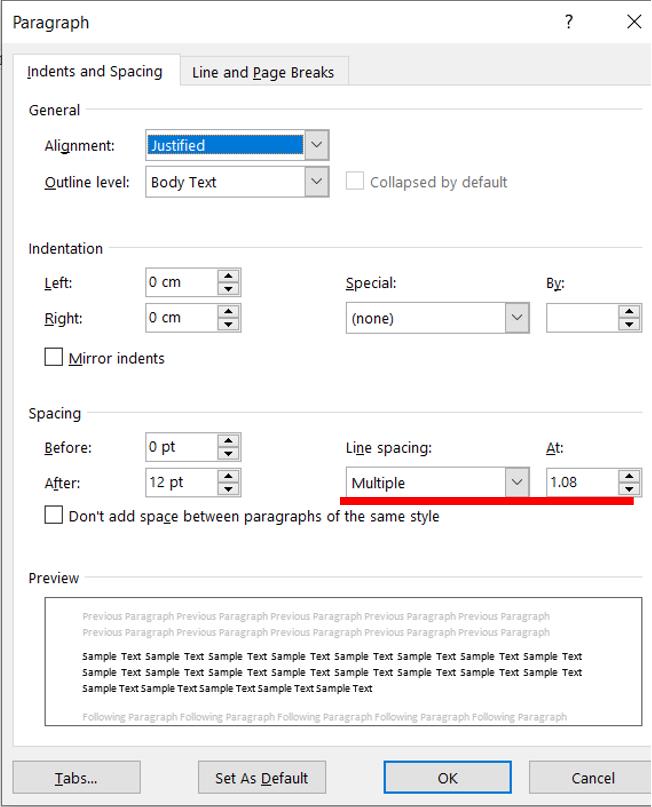
Figure 14 Clicking the “Spacing” link shows a dialog where you can change the line spacing
Shift-F1 is invaluable to pinpoint the formatting differences between two paragraphs. Use it often!
Avoid Documents Suddenly Changing When You Print or Save as PDF: Update Your Fields
This tip deals with automatic cross-references, not manually typed ones. For how to insert automatic ross-references and what else you can do with them, see my previous article here.
Have you ever had a cross-reference suddenly change after you printed your document or saved it as PDF? This happens because you didn’t update the Word document’s cross-references correctly. Cross-references are part of Microsoft Word’s fields, which simply mean parts of the document that Word can automatically update for you. Other common fields include page numbers and tables of contents (TOCs).
You should always use Word’s intended methods to update fields. Updating them wrongly, i.e. by manually typing on them, will cause problems such as unexpected changes in your document when printed or saved as PDF. This is how people often update fields incorrectly:
- Someone inserted an automatic cross-reference, e.g. to “clause 2” below,
- The cross-reference’s number becomes outdated, then
- Someone (else) manually deletes the old clause number and types in the new one, e.g. typing “clause 3”.
The result? The cross-reference shows the typed “clause 3”, but Microsoft Word still stores the original “clause 2” as the real underlying value. When you save a document as PDF or print it, Word automatically updates all fields to their real values. Thus your last-minute surprise with changed cross-references.
The right way to update a field is to right-click it and choose “Update field”. (To update a single field, you need not select it, just right-click it.) Or you can update all fields in your document at once by pressing Ctrl-A (select all) then F9 (update fields). (Note this updates all fields, including your TOC.) Updating fields correctly ensures that your displayed cross-reference matches your real cross-reference, so you won’t see any sudden surprises when you print your document or save as PDF. So use these two ways to update your cross-references rather than typing over them.
You can also make fields visible so that you and your team don’t accidentally type over your cross-references. You’d then see your cross-references (and other fields) highlighted in grey, like in Figure 15 below. I’ve explained how to do that in one of my previous articles.
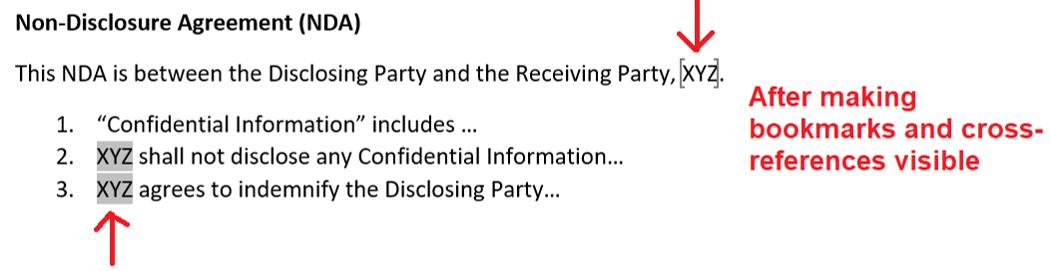
Figure 15 You can make cross-references (and bookmarks) visible
Update all fields regularly when drafting. Don’t wait till you’re about to finalise the document; use Ctrl-A and F9 often so that you can flush out any unexpected changes early. Some more points to note:
- If you find a cross-reference changes, deleting it and re-inserting the correct cross-reference should fix the problem.
- Search for “error” and “0” after updating all fields, as sometimes updating all fields causes “Error! Reference not found” or “clause 0” error messages.
- Updating all fields will also highlight unexpected changes in your TOC. As for how to fix them correctly to stop errors reappearing, see my previous article (on fixing TOC typos and formatting) and tip 7 below (on getting rid of unwanted body paragraphs in your TOC).
To summarise this tip: update all your cross-references regularly with Ctrl-A then F9, and don’t type in your cross-references.
Search for Cross-references to Check Them Quickly
We’ve talked about how to update all your cross-references. But if you added the cross-reference to the wrong clause in the first place, automatically updating your cross-references won’t fix that mistake. How can you quickly check all your document’s cross-references for accuracy?
Rather than scrolling through and looking for cross-references, use Find and Replace to speed up the process. There are two methods of searching for cross-references, each with its own pros and cons:
| Method | Remarks |
|---|---|
| Search for “clause” (and “cl”, “schedule”, “appendix” etc depending on your document) | Only finds cross-references with such prefix words.
You need to know all your document’s prefix words. |
| Search for numbers in your document
How to do it (see also Figure 16 below)
|
Finds all numbers in your document, not just cross-references (e.g. dates).
“Match prefix” is important, as it makes e.g. “2022” appear as a search result only once instead of four times (for “2”, “0”, “2” and “2”). |

Figure 16 You can search for “any digit” in Find and Replace

Figure 17 Find cross-references faster by searching for digits
This second method lets you jump through all the numbers in your document, though as noted above, these could include dates or amounts rather than only cross-references.
If your firm has money to spend on software, you can also consider a proofreading software by Litera called Contract Companion. It has various features including helping you check cross-references, showing the text of the clause being referred to in a split screen, and converting typed cross-references into automatic ones. (I don’t get anything from Litera for mentioning this; check them out if you’re interested.)
Search for (and Remove) Highlighted Text
Do you need to find all the highlighted text in your document? Perhaps you want to ensure you’ve removed all the highlighting before sending a document to the other side, or perhaps you’ve just received a document and want to find all the text that was highlighted. Find and Replace can help with this too:
- Open Find and Replace with Ctrl-H.
- Click in the “Find what” box, then click More > Special > Highlight as shown in Figure 18 below.
- (Optional – if you want to remove highlighting too) Click in the “Replace with” box, then click More > Special > Highlight twice. Your “Replace with” should say “Not highlight”, as per Figure 19 below.
- Click “Find next” to jump to the next highlighted text.
- (Optional, if you did step 3) Click “Replace” to remove the highlighting.
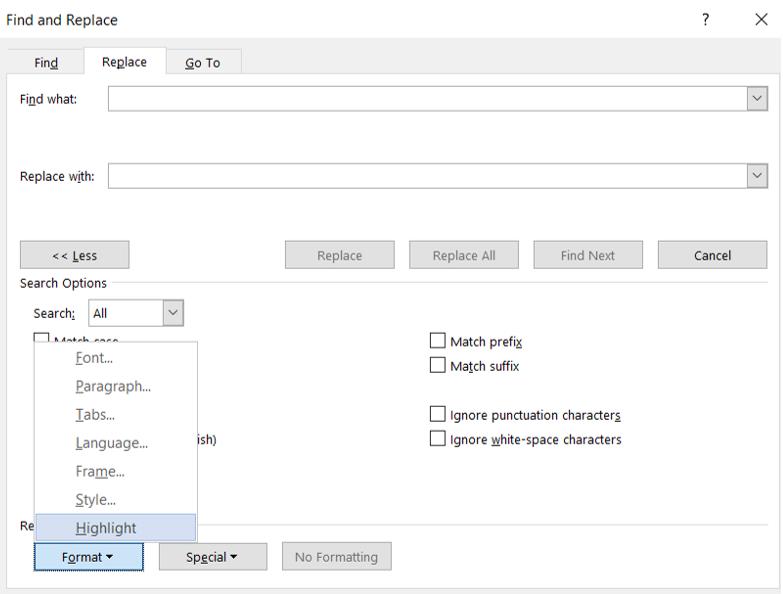
Figure 18 Find and Replace lets you search for highlighted words
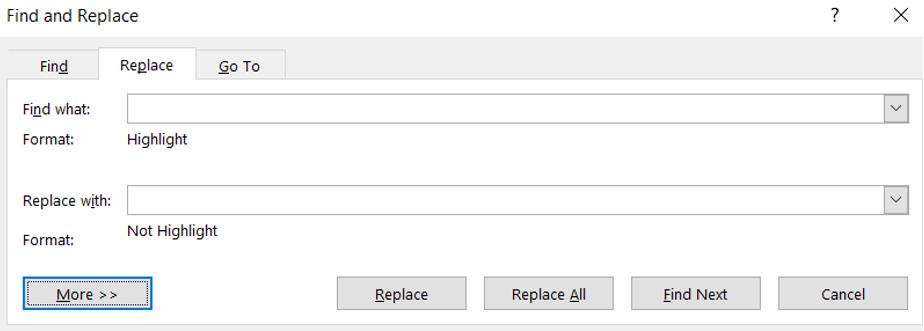
Figure 19 You can use Find and Replace to remove highlighting
Avoid Future Formatting Inconsistencies: Replace Section Breaks with Page Breaks
Do you know the difference between a page break and a section break? And why does it matter? You shouldn’t use them interchangeably – most of the time, you should use a page break rather than a section break. Both start your document on a new page, but using a section break may cause extra unintended consequences.
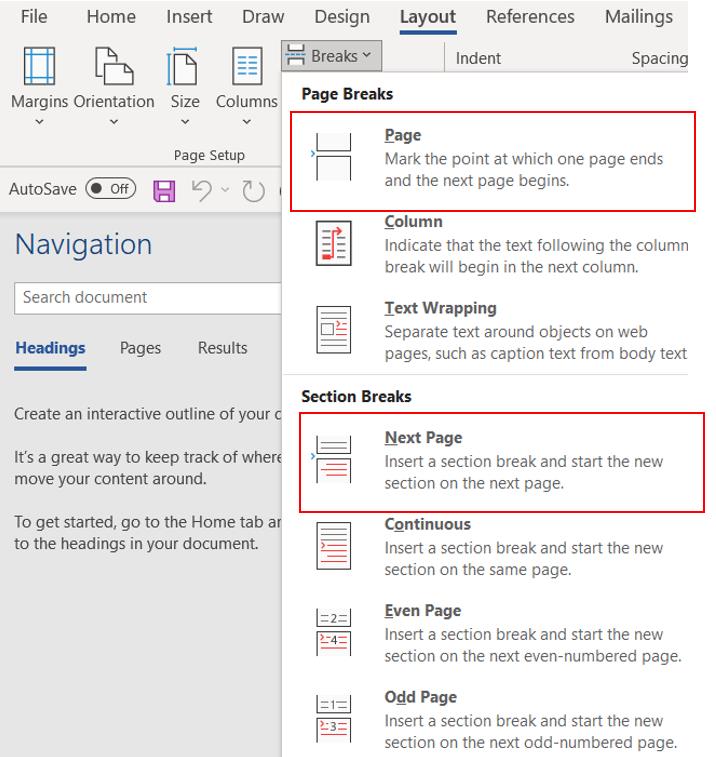
Figure 20 Page breaks have different effects from section breaks
The correct use of section breaks is to change the following properties within the same document:
- Page numbering (e.g. restart page numbering, or use a b c instead of 1 2 3)
- Headers/footers
- Page orientation, i.e. portrait/landscape
- Page margin widths
- Page sizes
Hence if you wanted your page numbering to restart at the schedules, or for part of your document to use landscape orientation instead of portrait, you need to use section breaks. But if you don’t plan to change any of the above properties and just want to start on a new page, use a page break instead. If you use a section break, you may accidentally create inconsistencies in your document, like in Figure 21 below.
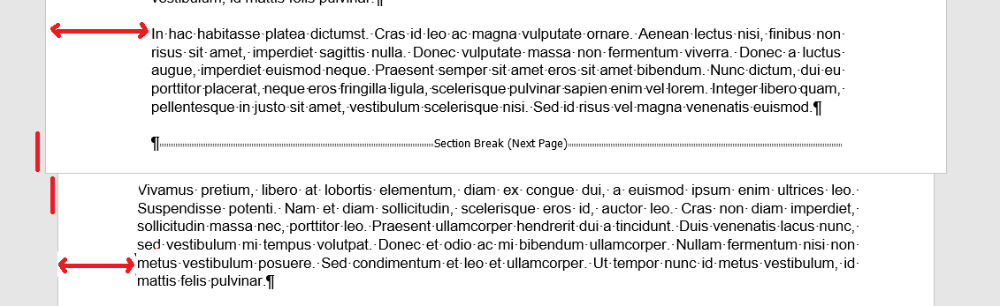
Figure 21 Using section breaks may cause accidental changes in page size and margin width between sections
Such accidental inconsistencies could happen where someone changes e.g. the page margins, thinking they are changing the margins for the whole document. But because the document has unnecessary section breaks, they actually change the margins for that document section only, thus causing inconsistencies.
You can use Find and Replace to quickly find the section breaks in your document and replace them with page breaks if necessary.
- Open Find and Replace with Ctrl-H.
- Click in the “Find what” box, then More > Special. Choose “Section break” (see Figure 22 below).
- Click in the “Replace with” box, then More > Special. Choose “Manual page break”. (Your screen should look like Figure 23 below.)
- Click “Find next” to find the section breaks. If you turn on “Show/hide paragraph formatting”, you can see the section breaks (see Figure 24 below).
- Click “Replace.
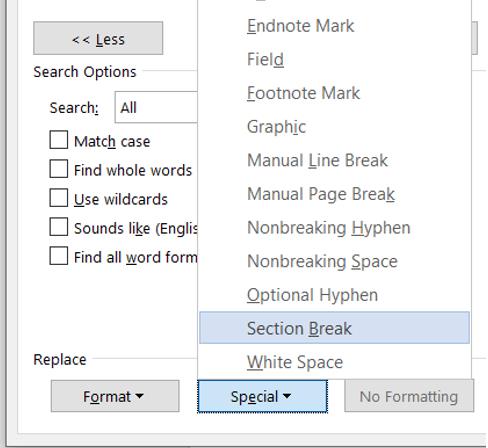
Figure 22 Select “Section break” under “Special” to find them
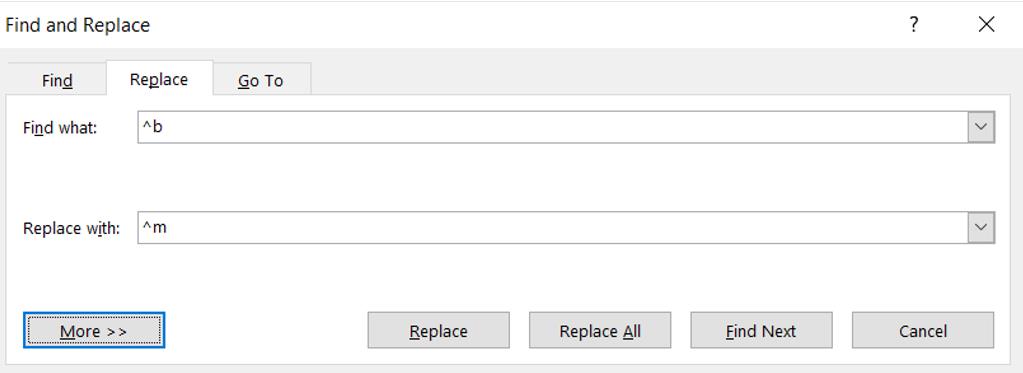
Figure 23 How to replace section breaks with page breaks
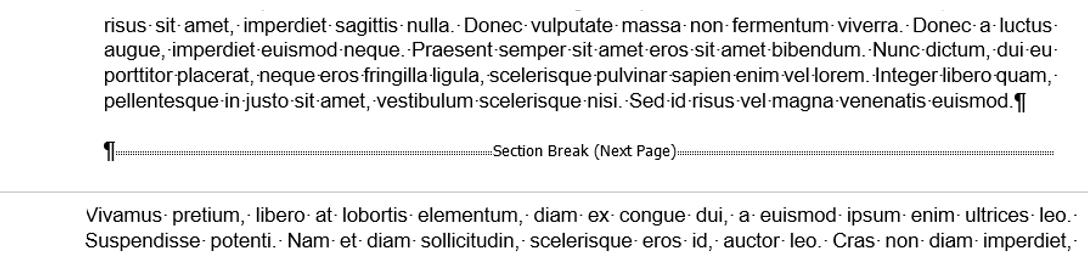
Figure 24 You can make section breaks visible by turning on “Show/hide paragraph formatting”
Stop Unwanted Paragraphs Appearing in Your Table of Contents: Check That Your Styles are Applied Correctly
Do you have paragraphs appearing in your TOC even though they aren’t headings? And even after you delete them from the TOC, they come back after you print or save as PDF? (Like in Figure 25 below.) This is a common problem which shows what can happen when styles are not applied consistently. (If you’re not familiar with styles, check out my previous article on that.)
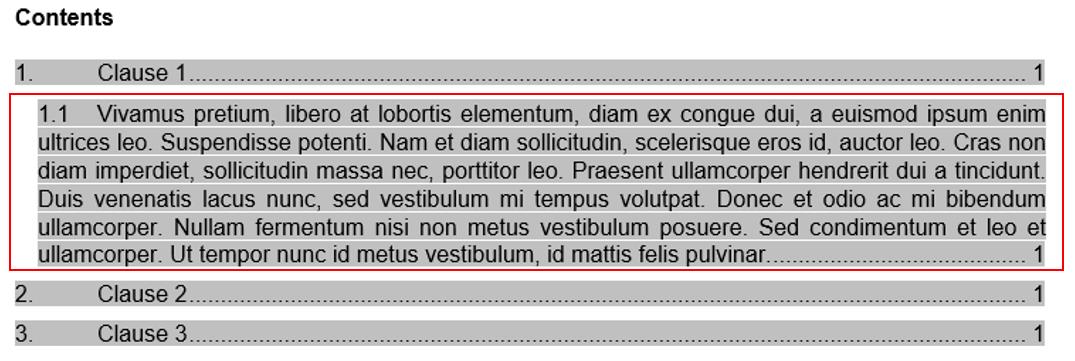
Figure 25 You deleted those paragraphs from the TOC, but they come back after printing or saving as PDF
This error often happens because body paragraphs in your documents have been wrongly formatted with a heading style. Since TOCs are usually generated from heading styles, any text formatted with a heading style will appear in the TOC.
To fix this problem, you first need to check what style these unwanted paragraphs have in your document’s body. If they have a heading style, then apply a different style. We’ll look at each step in turn.
Three ways to check what style a paragraph has, and which is best
You can check what style text has in three ways:
- Click in the text and check the Styles Gallery, which is the way most people do it (see Figure 26 below),
- “Reveal formatting” via Shift-F1, as described in tip 2 above, and
- Check the styles in the “Style area pane” on the left, which I will discuss.
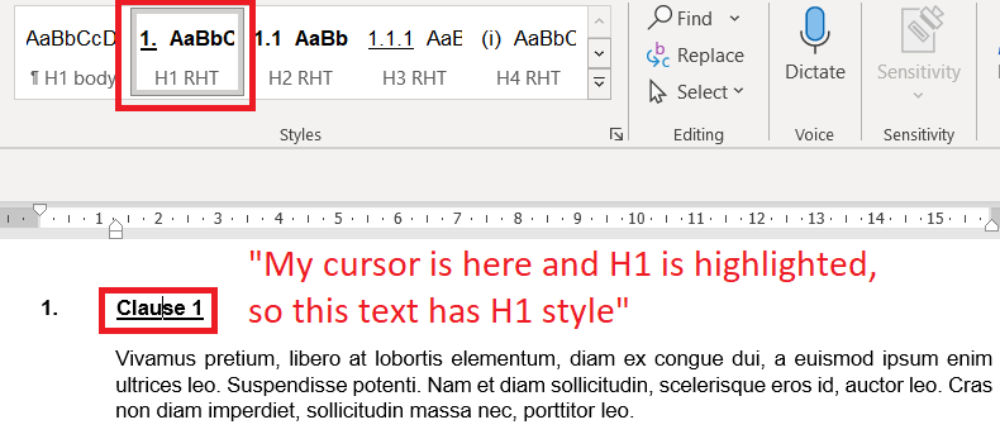
Figure 26 How most people check what style text has
Clicking the text then checking the Styles Gallery may be the most common method, however it has its drawbacks:
- If the Styles Gallery is very cluttered, it’s hard to see what style was applied, and
- It’s too time-consuming if you need to check multiple paragraphs.
To check a single paragraph’s style, Shift-F1 may be faster. To check multiple paragraphs, you can make each paragraph’s style visible on the left, as shown in Figure 27 below. Then you can scroll through your document to see the styles.

Figure 27 You can make each paragraph’s style visible on the left, in the Style Area pane
This is how to set that up:
- Go to File > Options > Advanced > Display, as shown in Figure 28 below.
- Set “Style area pane width in Draft and Outline views” (again in Figure 28 below) to be more than 0cm (I suggest 3cm).
- Click “Ok”.

- Go to View > Draft view (in Figure 29 below). Now you can see the styles on the left pane.

- To return to the “normal” view, click View > Print Layout (also in Figure 29 below).
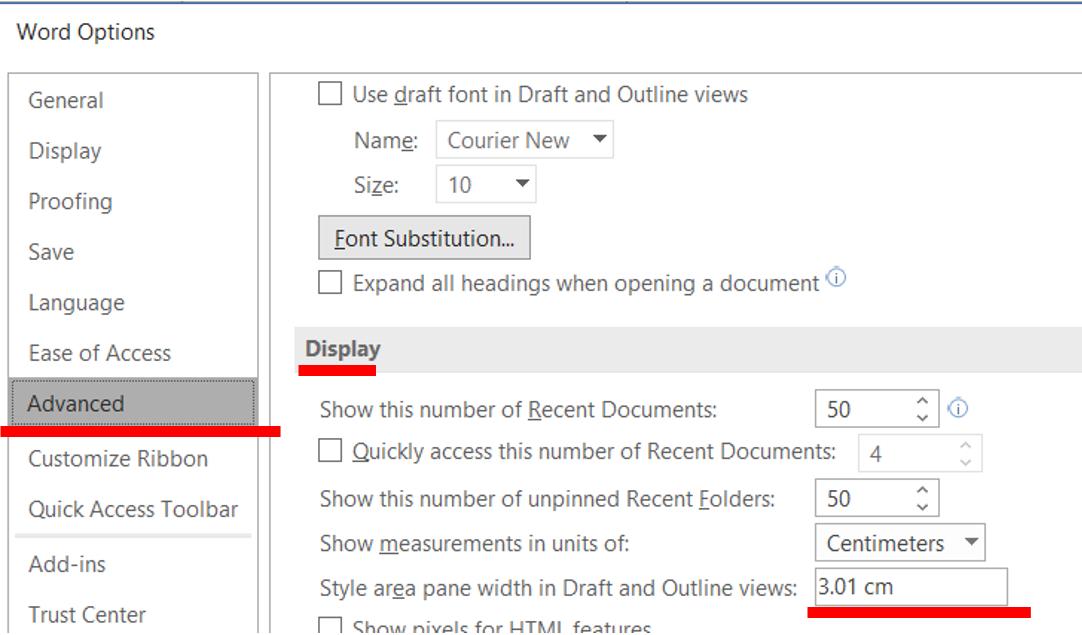
Figure 28 How to turn on the Style Area pane

Figure 29 Use Draft and Print Layout views to show the left pane or return to the usual view
How to get rid of body paragraphs in your table of contents
To remove a body paragraph from your TOC, go to that paragraph in your document’s body (not the TOC) then check what style it has (as per Figure 30 below).
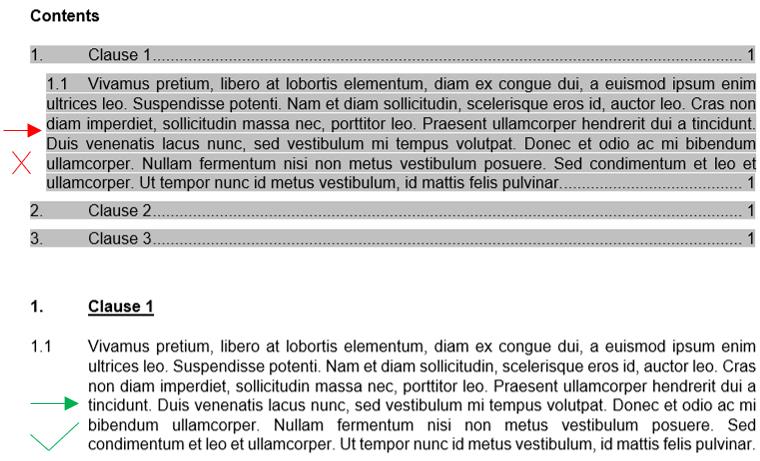
Figure 30 Check what style your paragraph uses in the document’s body (not in the TOC)
Your paragraph likely uses a heading style.4Less commonly, TOCs can be generated from non-heading styles which have outline levels applied. If your paragraph does not use a heading style and yet appears in the TOC, use Shift-F1 to check if it has an outline level. If so, you can also remove the outline level from Shift-F1, or by these steps https://wordribbon.tips.net/T010515_Changing_Outline_Heading_Level.html. If so, apply Normal style instead – or whatever style your document uses for body paragraphs. Then update your TOC, and that body paragraph should have disappeared.
How come your body paragraphs had a heading style, yet didn’t look like headings? Because styles differ from direct formatting (which I discussed in my previous article on styles). Someone may have previously tried to “remove” the heading style by selecting the paragraphs and un-bolding them (e.g. Figure 31 below). Instead, the correct way to remove a style is to apply a different style.
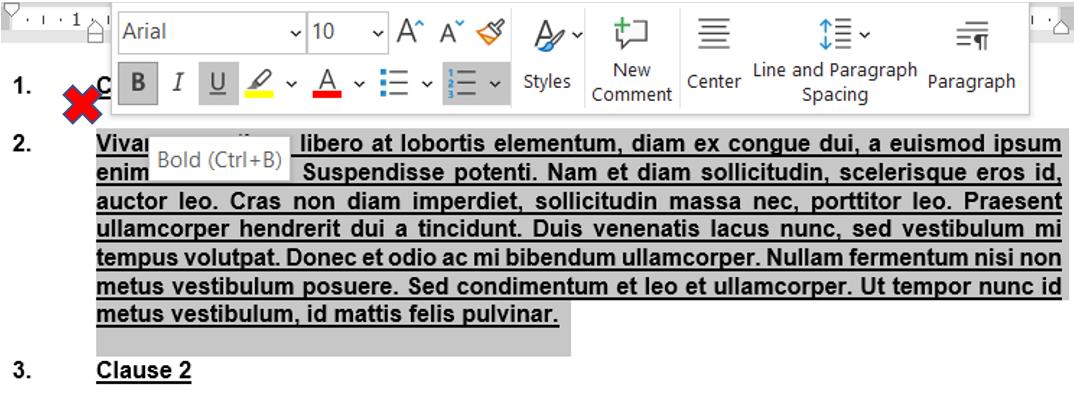
Figure 31 To remove a wrongly-applied heading style, apply a different style. Don’t just un-bold the text
Congratulations, you now know how to remove unwanted body paragraphs from your TOC.
Bonus: Clean Up Confidential Metadata When You’re Done with Your Document
This tip begins with a sad story of a breach of client confidentiality. A client, let’s call them Client A, opened a PDF addressed to them, only to find that the PDF’s title and tab contained the name of Client B. (See Figure 32 and Figure 33 below.)

Figure 32 Document name says “Client A”
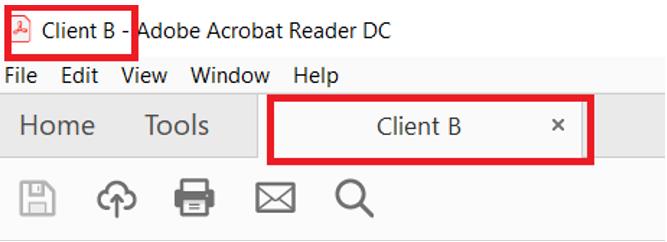
Figure 33 But document title and tab say “Client B”
How could this have happened? This occurred because the document’s metadata was not removed. Metadata means information about a document, like the document’s author, date it was first created, and how long you’ve spent working on it. Sometimes it can also include sensitive information like the name of a client or a deal. I managed to reproduce how this unfortunate mistake unfolded:
- Someone had typed Client B’s name into the document’s title, which is part of a document’s metadata. You can see the “title” under File > Info (see Figure 34 below). It’s usually blank, but anyone can add to it. Note the title differs from the document’s file name.
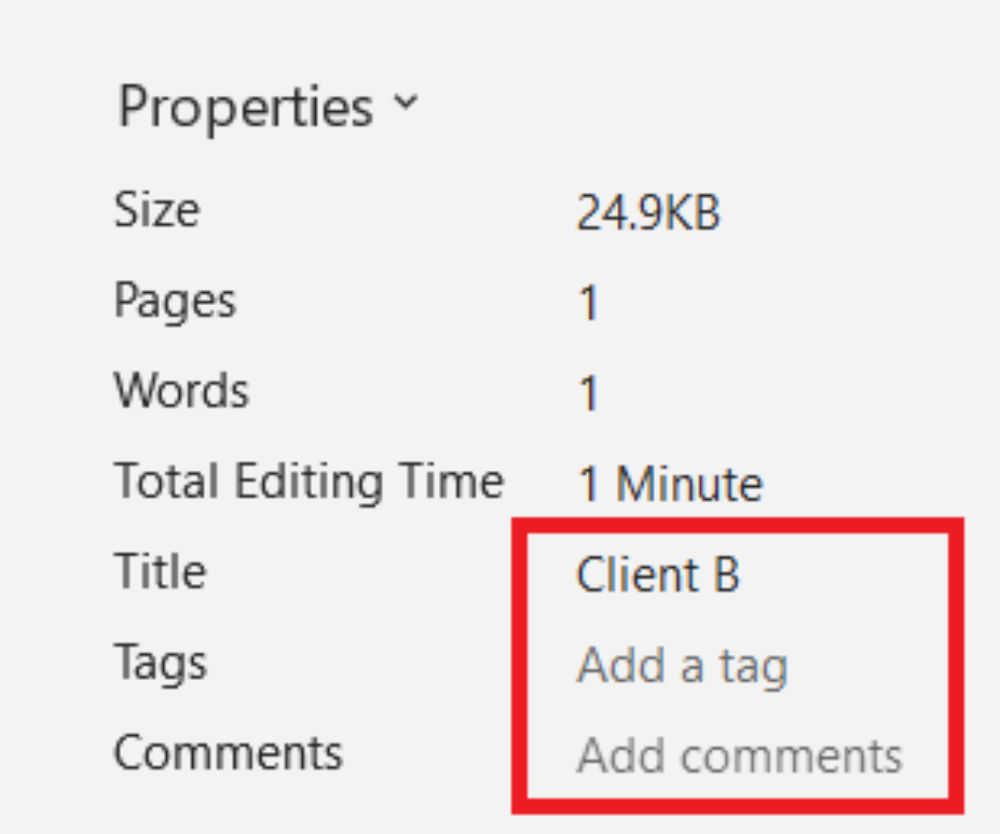
Figure 34 “Document title” is part of a document’s metadata and can contain sensitive info
- Client B’s document was used as a base for Client A’s. It was saved under a file name reflecting Client A, but it still had “title” metadata with Client B’s name. (See Figure 35 below. No one noticed Client B in the “title” metadata since people rarely go to the File > Info screen.)

Figure 35 Your file’s name differs from its title
- The document was saved as PDF. PDF, unlike Word, shows the “title” metadata in a prominent place – at the top of the file when opened, and in the tab. Naming the file “Client A” didn’t solve the problem, since file name and title differ!
To avoid such errors, always remove metadata from your Word document before you send it to external parties or save it as a PDF. This is a quick process that can be done in less than 2 minutes:
- Save a copy of your document first if necessary, as changes are irreversible.
- Go to File > Info > Inspect document > Inspect document (Figure 36 below).
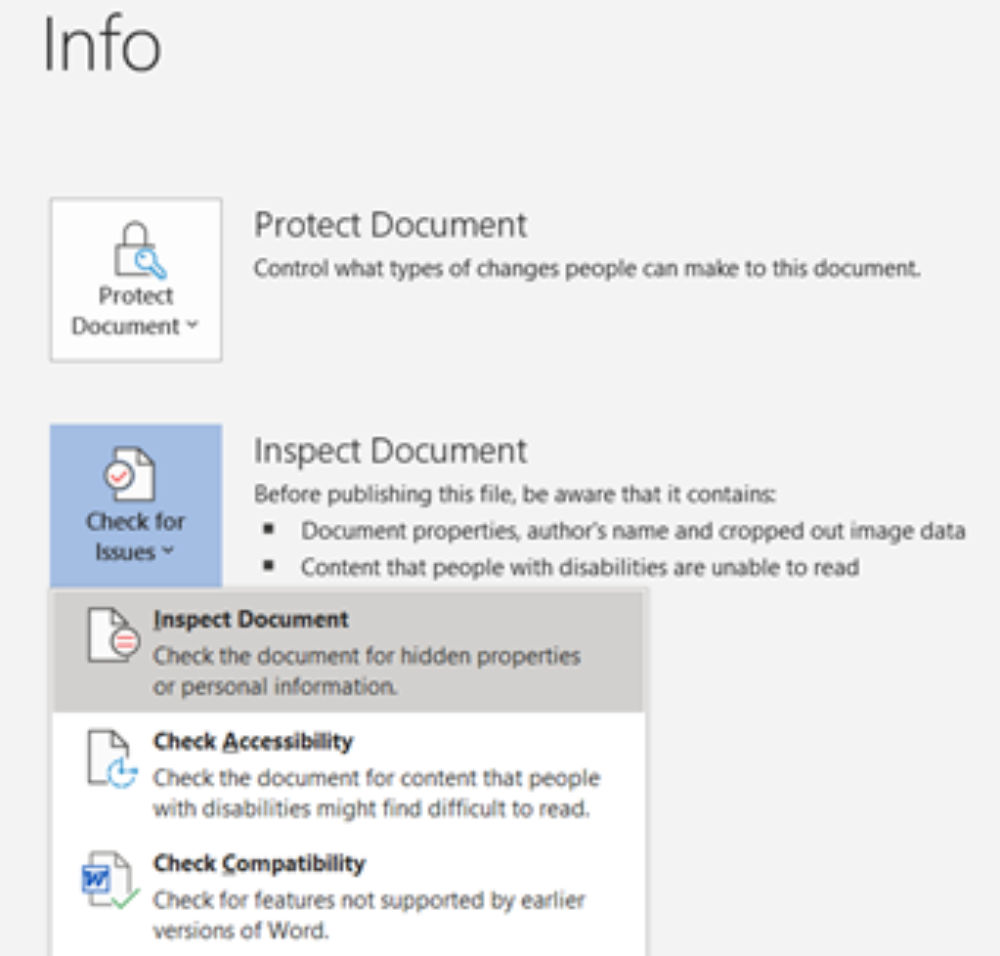
Figure 36 How to remove your document’s metadata
- Click Inspect.
- Click “Remove all” for each category of metadata you want to remove (scroll down to see all categories.) Generally you should remove all the metadata.
- Always remove “Document properties and personal information”. This contains information like the document’s author, total time spent editing, and document title (which caused the breach in our story above).
- Consider if you want to keep “Comments, revisions and versions” or “Headers, footers and watermarks”. Otherwise, remove them.

Figure 37 Remove all the metadata found
That’s it! These simple steps will protect you from ever accidentally disclosing sensitive information via your documents’ metadata.
Bonus: Lock “Track Changes” to be Always On
If you want to make sure that your counterparty uses tracked changes, you can turn on “Track changes” and require a password to turn it off. This is how to do it:
- Go to Review > Track changes > Lock tracking > Enter password.
- Enter a password, if desired. You can also leave this blank. Click “Ok”.
- To turn off “locked track changes”, repeat the steps above and enter the password, if any.
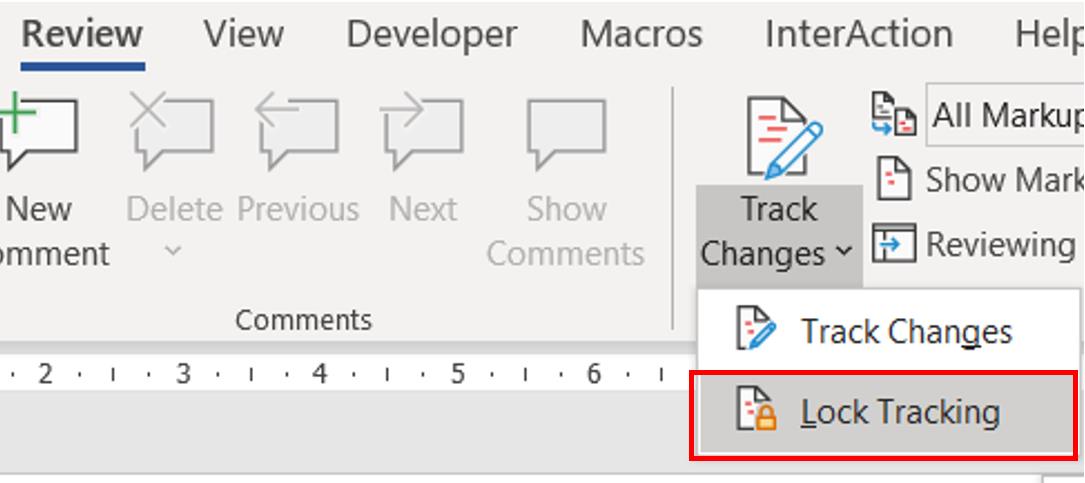
Figure 38 Where to turn on/off “locked track changes”
Remember your password! If you forget it, there is no way to recover it. Also note that this method isn’t foolproof – a determined recipient could easily copy and paste the whole document into a new document to avoid tracking changes, or find another way around it.
As you can imagine, you should exercise wisdom and discretion in deciding when to use this method with a counterparty.
- Note that your counterparty cannot accept or reject changes when “lock tracking” is turned on, including accepting or rejecting their internal changes, so that may make it hard for them to review the document internally. Nor can they accept or reject your tracked changes.
- See also this lawyer who argues that you should not use “lock tracking” for commercial contract negotiations because it slows down the process and annoys your counterparty.
Regardless of whether you use “lock tracking” for external parties, it also can help within your firm. I sometimes use it – leaving the password blank – to guard against accidentally changing a document.
Conclusion
These tips will help you proofread better, faster and more efficiently. Whether you need to clean up an existing problem or prevent future problems, Microsoft Word likely already has a feature that helps you do that. Learn them, practice them, and if you find them helpful, share them with others too.
Endnotes
| ↑1 | I first learned of these methods via Deborah Savadras’ very helpful site on Word tips for lawyers, at https://legalofficeguru.com/4-fastest-formatting-fixes-i-know/. |
|---|---|
| ↑2 | On how Normal style clears direct formatting that takes up more than half a paragraph https://shaunakelly.com/word/styles/stylesoverridedirectformatting.html |
| ↑3 | How to open “Reveal formatting” using a (hard to access) button https://www.teachucomp.com/reveal-formatting-in-word-instructions/ |
| ↑4 | Less commonly, TOCs can be generated from non-heading styles which have outline levels applied. If your paragraph does not use a heading style and yet appears in the TOC, use Shift-F1 to check if it has an outline level. If so, you can also remove the outline level from Shift-F1, or by these steps https://wordribbon.tips.net/T010515_Changing_Outline_Heading_Level.html. |