

Microsoft Word Hacks for Young Lawyers: How to Automate Your Cross-References
This article is the second of the Law Society of Singapore’s Legal Research & Development department’s two-part series called “Microsoft Word hacks for young lawyers”.
Introduction
“I have an authority that was originally cited in full in footnote 1, but I’ve added new footnotes so now the full citation is in footnote 3. Do I have to find all my subsequent footnotes that say ‘see full citation at footnote 1’ and change each one to refer to footnote 3?”
“This contract has so many clauses that refer to other clauses’ numbers. What’s the fastest way to update the clause numbers if we add or remove any clauses after negotiations?”

“I’ve just finished my 100-page closing submissions with multiple internal references to other paragraphs. Do I really have to review and amend all references if my partner shifts just one paragraph upon review?”
“How do I type a party’s name in one place and make it update everywhere in the document?”
If you’ve ever struggled with any of these questions, this article is for you. The previous article in this series looked at how to use styles. Drawing on situations that young lawyers are likely to encounter in practice, this article explains how to use cross-references so that you can work more effectively and efficiently. It will cover:
- What are Microsoft Word’s built-in cross-references? Why should you use them?
- How to make bookmarks and cross-references visible (so that you can work with them more easily)
- Cross-referencing footnote numbers
- Cross-referencing numbered paragraphs or clauses
- How to type a party’s name in one place and update it everywhere in the document (using bookmarks and cross-references)
- Frequently-asked questions
All references in this article are to Microsoft Word 2016.
What are Microsoft Word’s Built-in Cross-references? Why Should You Use Them?
Microsoft Office Support describes a cross-reference as “allow[ing] you to link to other parts of the same document”.1Microsoft, “Create a cross-reference”, Microsoft Office Support <https://support.office.com/en-us/article/create-a-cross-reference-300b208c-e45a-487a-880b-a02767d9774b> (accessed 31 May 2019). While this sounds straightforward, the real power of cross-references is that you can update them automatically when the referenced text changes. Figure 1 below illustrates this benefit – you can always keep your references to the numbers of other footnotes up-to-date by using cross-references.

Figure 1 Benefits of using cross-references
Cross-references are part of a powerful group of features in Microsoft Word called “fields”, which are “placeholders for data that might change in your document”. 2Microsoft, “Insert, edit, and view fields in Word”, Microsoft Office Support <https://support.office.com/en-us/article/insert-edit-and-view-fields-in-word-c429bbb0-8669-48a7-bd24-bab6ba6b06bb> (accessed 31 May 2019). Fields are used to “automate certain aspects of your document”.3Ibid. Page numbers and tables of contents are other examples of fields that can update automatically as your document changes, so you are likely already using fields without knowing it.
Figure 2 below shows what updating footnote numbers might look like without cross-references – you would have to highlight or otherwise keep track of all references to other footnote numbers, and remember to manually update them whenever you add or remove footnotes.
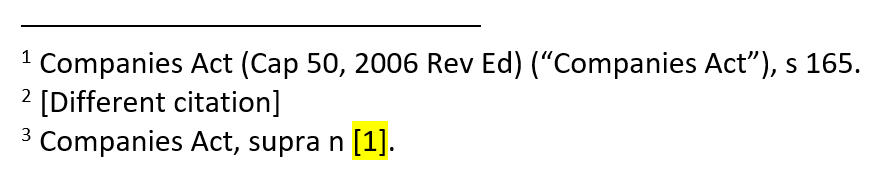
Figure 2 What to avoid – manually referring to other footnote numbers
Hence the benefits of cross-references are:
- Saving you time in having to manually check that references are updated, and
- Enhancing your work quality because the cross-references will be up-to-date even after multiple amendments to your document.
How to Make Bookmarks and Cross-references Visible (So That You Can Work With Them More Easily)
You may notice that in Figure 1 above, the footnote cross-references are highlighted in grey. To get started with using cross-references, you should first set up your Microsoft Word program so that you can see them. To display bookmarks and fields (including cross-references) in Microsoft Word:
- Go to File > Options > Advanced.
- Scroll to “Show document content”.
- Tick “Show bookmarks”.
- Change “Field shading” to “Always”.
Figure 3 below illustrates these steps.

Figure 3 How to display bookmarks and fields (including cross-references)
Figure 4 below shows what your screen would look like before and after you make bookmarks and fields (including cross-references) visible.
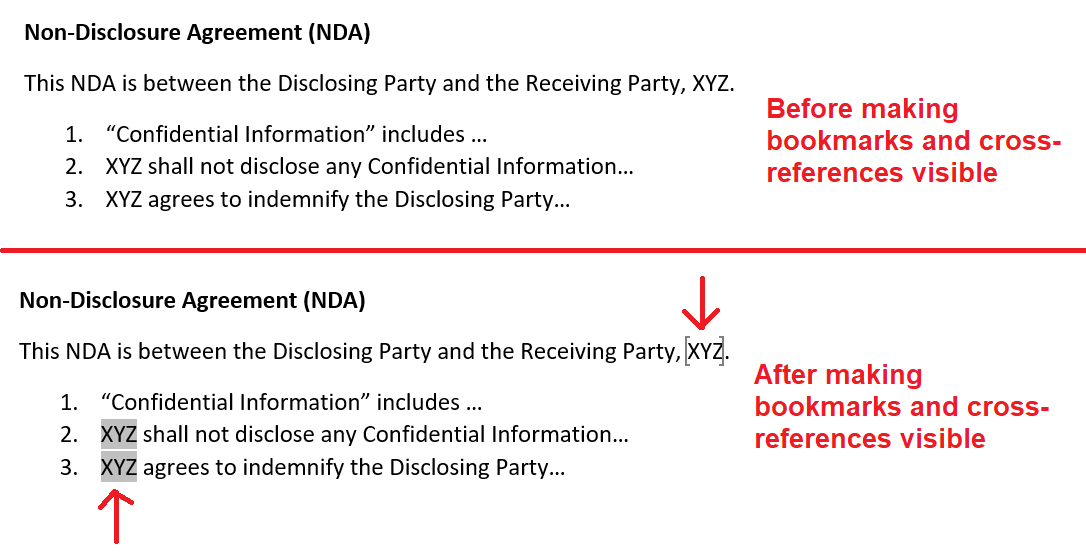
Figure 4 Displaying bookmarks and fields (including cross-references) – before and after
Why do you need to make bookmarks and fields (including cross-references) visible? So that you do not accidentally change or delete any bookmarks or cross-references, which can cause cross-references to break.
For the same reason, if you work in a team, encourage your team members to change their settings to display bookmarks and fields too. (More tips for working in teams will be discussed later under “Should I use automatic cross-references if I work in a team?”).
Also, bookmarks and fields will display on your computer only – the settings are specific to your Microsoft Word program. That is, these symbols will not print, or show up on anyone else’s computer.
Cross-referencing Footnote Numbers
Add a cross-reference
As illustrated in Figure 1 above, you can update all footnotes that reference the number of another footnote automatically, by using cross-references.
Imagine you are creating a new document and want to add a footnote 3 that refers to footnote 1. Instead of typing “see footnote 1”, you should add a cross-reference to the footnote number:
- Move your cursor to the place you want to add a cross-reference.
- Go to References > Cross-reference.
- Under “Reference type”, choose “Footnote”.
- Select the footnote you want to reference.
- Click “Insert”.
Figure 5 below illustrates these steps.
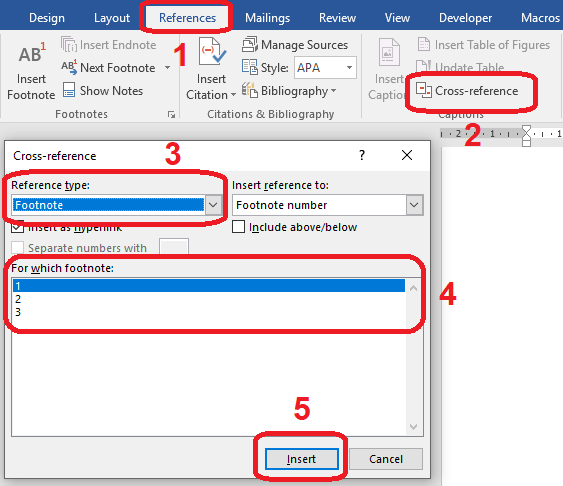
Figure 5 How to add a footnote cross-reference
A cross-reference showing the footnote number (e.g. “1”) should appear in your document.
Update a cross-reference
After setting up your document with cross-references, you need to remember to update those cross-references before finalising the document. Otherwise, your references will remain outdated.
- Click in the footnote section of your document (see Figure 6 below).
- Press Ctrl-A to select all footnotes.
- Press F9 to update all cross-references.
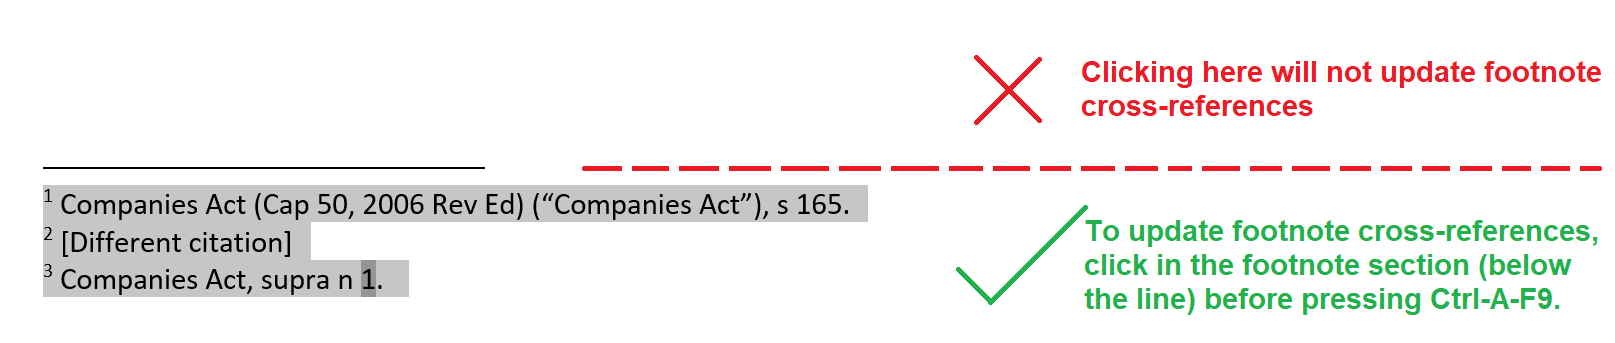
Figure 6 Click in the footnote section, not above it, before pressing Ctrl-A-F9 to update all footnotes
Cross-referencing Numbered Paragraphs or Clauses
“This contract has so many clauses that refer to other clauses’ numbers. What’s the fastest way to update the clause numbers if we add or remove any clauses after negotiations?”
“I’ve just finished my 100-page closing submissions with multiple internal references to other paragraphs. Do I really have to review and amend all references if my partner shifts just one paragraph upon review?”
Add a cross-reference to a paragraph number
If you have a document such as the NDA in Figure 7 below, where clause 2 refers to clause 1, using cross-references can help you to quickly update all cross-referenced clause numbers.

Figure 7 Example of adding a cross-reference to a clause or paragraph number
To add a cross-reference to a clause or paragraph number:
- Move your cursor to the place you want to add a cross-reference.
- Go to References > Cross-reference.
- Under “Reference type”, choose “Numbered item”.
- Select the paragraph/clause number you want to refer to.
- Under “Insert reference to”, choose “Paragraph number” or “Paragraph number (full context)”. (See Figure 9 below to find out which is better, depending on your firm’s citation style.)
- Click “Insert”.
Figure 8 below illustrates these steps.
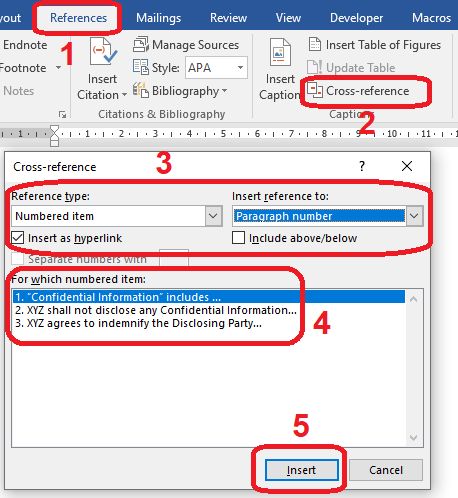
Figure 8 How to add a cross-reference to a clause or paragraph number
What’s the difference between “Paragraph number” and “Paragraph number (full context)”? Figure 9 below illustrates this.
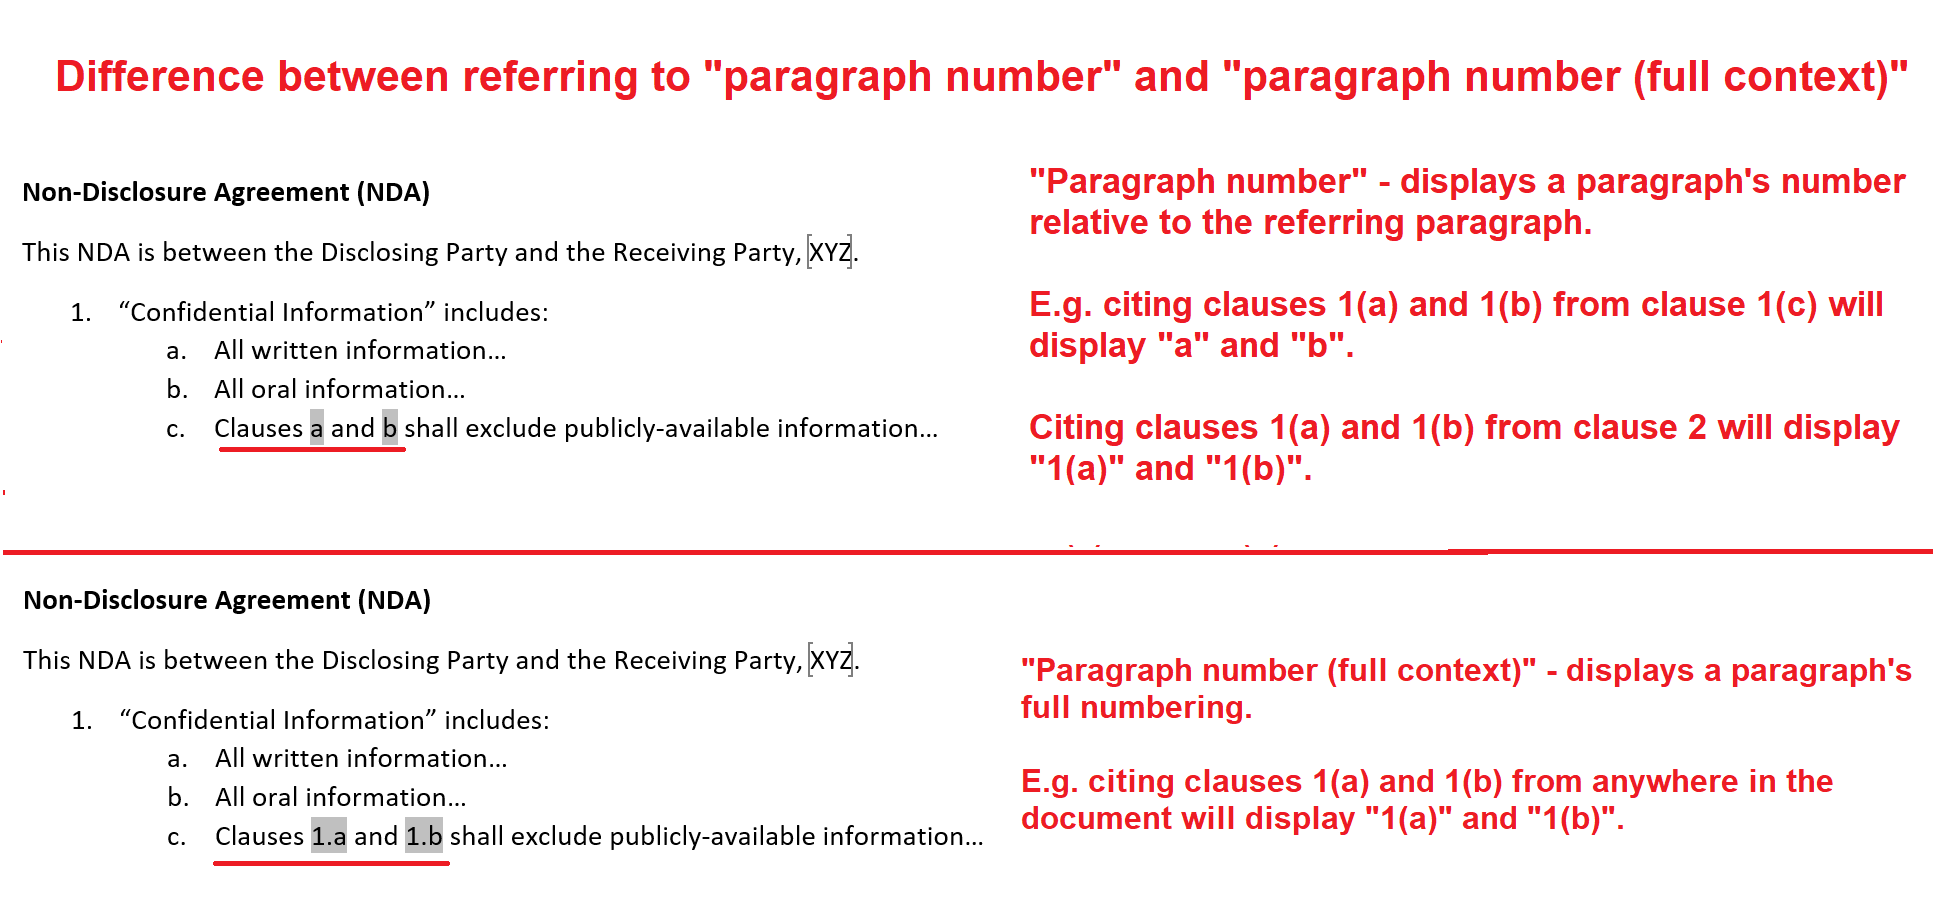
Figure 9 Difference between citing “paragraph number” and “paragraph number (full context)”
Add a cross-reference to a page number
To cross-reference a page number, follow the same steps under “Add a cross-reference to a paragraph number” above, but select “Page number” instead of “Paragraph number” for step 5. (Figure 10 below illustrates cross-referencing a page number).
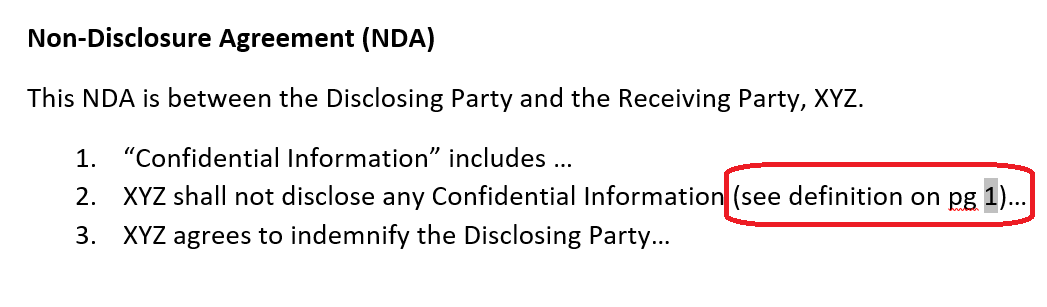
Figure 10 Example of adding a cross-reference to a page number
Update a cross-reference
After setting up your document with cross-references, you need to update those cross-references before finalising the document.
- Click in the body section of your document (i.e. not the header or footer).
- Press Ctrl-A to select all paragraphs.
- Press F9 to update all cross-references. (This will also update other fields in your document, such as the table of contents.)
For future contracts that you draft, you add cross-references to other clause numbers rather than typing “See clause X” manually. You now freely add and remove clauses during negotiations, confident that you can quickly update all the referenced clause numbers by clicking in your document’s body and pressing Ctrl-A to select all clauses, then F9 to update all cross-references.
You use the same technique for future submissions. Using cross-references to refer to other paragraph numbers, rather than type them manually, means you no longer need to worry about updating internal references if any paragraphs are moved when someone else edits the document.
How to Type a Party’s Name in One Place and Update it Everywhere in the Document (Using Bookmarks and Cross-references)
Why Find and Replace doesn’t always work
If you have a contract drafted for party ABC, and want to update the party’s name to party XYZ, you could use “Find and Replace” (keyboard shortcut Ctrl-H) to replace “ABC” with “XYZ”. This method will be suitable in many cases but not all, e.g. if the phrase “ABC” occurs elsewhere in your document other than in the party’s name. Figure 11 below shows an example.
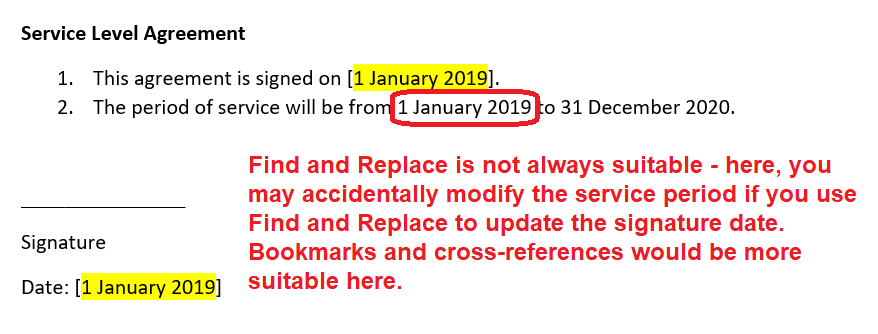
Figure 11 Find and Replace is not always suitable to update a piece of text
Figure 12 below illustrates an alternative approach using bookmarks and cross-references.
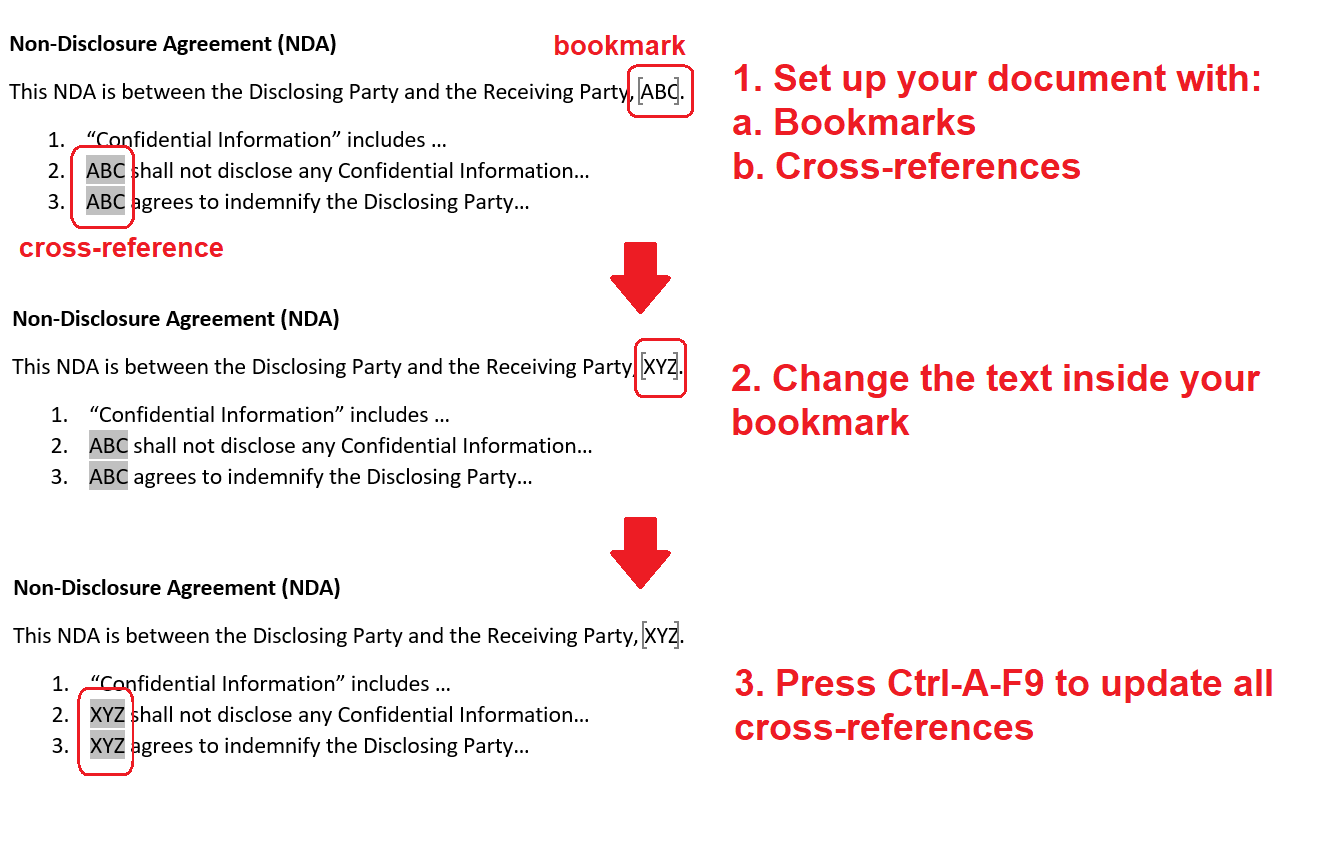
Figure 12 At a glance: How to use bookmarks and cross-references
Add a bookmark
First, locate the first time your party’s name occurs in the document. This is where you add a bookmark, and where you will change the party’s name in order to update it everywhere else in the document. To add a bookmark:
- Select the party’s name.
- Go to Insert > Bookmark.
- Type a name for your bookmark (e.g. PartyName) and click “Add”.
The party’s name should now be enclosed in square brackets, showing that the bookmark has been added. Figure 13 below shows the process of adding a bookmark.

Figure 13 How to add a bookmark
Add a cross-reference to the bookmark
If you need to refer to the party’s name subsequently, add a cross-reference to that bookmark (process illustrated in Figure 14 below):
- Move your cursor to the place you want to add a cross-reference.
- Go to References > Cross-reference.
- Under “Reference type”, choose “Bookmark”.
- Select the bookmark you want to refer to.
- Click “Insert”.

Figure 14 How to add a cross-reference to a bookmark
Update a cross-reference to a bookmark
After setting up bookmarks and cross-references, you can easily update a party’s name throughout the document:
- Modify the party’s name in your bookmark (see Figure 12 above). Take care not to accidentally delete the bookmark when typing inside it.
- Click in the body section of your document (i.e. not the header or footer).
- Press Ctrl-A to select all paragraphs.
- Press F9 to update all cross-references. (This will also update other fields in your document, such as the table of contents.)
You look at your contracts and consider – which pieces of recurring text can be updated using “Find and Replace”? Which ones do you want to invest time in to add bookmarks and cross-references? On reflection, you decide that you can safely update the parties’ names using “Find and Replace”, but you want to use bookmarks and cross-references for the signature dates and the payment amounts, to ensure that these are consistent throughout the contract.
You add bookmarks to the first instance of the signature date and payment amount, and add cross-references to these bookmarks for all subsequent times the signature date or payment amount are stated. When updating the contract for subsequent transactions, you only need to change the signature date and payment amount once – in their respective bookmarks. Then you update all subsequent cross-references by clicking in the document’s body, pressing Ctrl-A to select all text, and F9 to update all cross-references.
Frequently-asked Questions
I added cross-references, but they are not updated!
After adding cross-references, remember that you still need to update them by pressing Ctrl-A-F9 before you finalise your document. (For footnotes, click in the footnotes section before pressing Ctrl-A-F9.)
Help! My document shows “Error! Reference source not found”.
This error appears if you have deleted the footnote, paragraph or bookmark that your cross-reference refers to (see Figure 15 below). To fix this, ensure that your cross-reference refers to an existing footnote, paragraph or bookmark.

Figure 15 Common errors – “Error! Reference source not found”
Should I use automatic cross-references if I work in a team?
Here are three tips to make cross-references work for your team:
- Encourage your team members to turn on “Display bookmarks and fields” (why not send them this article?) How to do this is described in section 3 above. This is to minimise the chance of someone accidentally deleting a bookmark or cross-reference.
- Remind the person who will finalise the document to update all cross-references using Ctrl-A-F9 before sending it out.
- If you are working on a document someone else created, press Ctrl-A-F9 before adding cross-references and see if anything goes wrong (e.g. you see “Error! Reference source not found”, or the table of contents changes formatting).4On common errors with creating a table of contents and how to avoid them, see Stella Chen, “Microsoft Word Hacks for Young Lawyers: Introduction to Using Styles” Singapore Law Gazette (March 2019). Use cross-references only on “clean” documents.
How do I format my cross-references?
Cross-references keep their source formatting. You can re-format them to suit their destination formatting, and they will keep the new formatting even after they are updated. See Figure 16 below for an illustration.
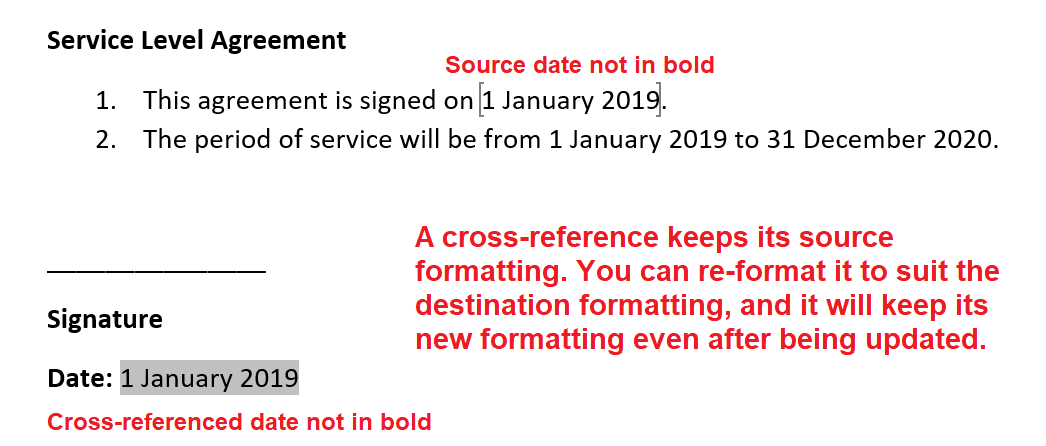
Figure 16 A cross-reference keeps its source formatting – you can reformat it to its destination formatting
My cross-reference is showing curly brackets and strange letters.
This error, as shown in Figure 17 below, is easy to fix – simply press Alt-F9.

Figure 17 Common errors – displaying field codes rather than text
Can I add cross-references to a different document?
Due to the way Microsoft Word works, cross-references work only for references within the same document.
You’ve mastered how to use cross-references. You no longer need to spend valuable time checking through footnotes for outdated references to other footnote numbers, combing contracts to make sure that references to other clause numbers are correct, or manually updating a party’s name – or other repeated information – throughout a document.
You are a lawyer who understands how to use technology effectively and efficiently, and can thus focus your time on doing higher-value work.
If you enjoyed this article from the Law Society of Singapore’s Legal Research & Development department’s “Microsoft Word hacks for young lawyers” two-part series, check out our previous article on “Introduction to using styles”.
Endnotes
| ↑1 | Microsoft, “Create a cross-reference”, Microsoft Office Support <https://support.office.com/en-us/article/create-a-cross-reference-300b208c-e45a-487a-880b-a02767d9774b> (accessed 31 May 2019). |
|---|---|
| ↑2 | Microsoft, “Insert, edit, and view fields in Word”, Microsoft Office Support <https://support.office.com/en-us/article/insert-edit-and-view-fields-in-word-c429bbb0-8669-48a7-bd24-bab6ba6b06bb> (accessed 31 May 2019). |
| ↑3 | Ibid. |
| ↑4 | On common errors with creating a table of contents and how to avoid them, see Stella Chen, “Microsoft Word Hacks for Young Lawyers: Introduction to Using Styles” Singapore Law Gazette (March 2019). |