


Technology Basics – Part 2: Commanding the Content
Mastering Microsoft Word Like a Pro
Welcome to the second installment of the “Technology Basics” series, brought to you by the Law Society’s Representation and Law Reform department. This series aims to offer lawyers practical tips on how to make the most of your technological tools in your daily practice. Read Part 1 on Microsoft Outlook (Taming the Inbox) here.
This article focuses on Microsoft Word, a word-processor software that enables users to create, edit, and format text documents.
Note: The features discussed in this article are based on the Microsoft Word 2016 desktop application for Windows. These features may appear differently in Microsoft Word 2016 for macOS, the web version of Microsoft Word 2016, and subsequent versions of Microsoft Word for Mac and Windows.

Introduction
Legal documents, including contracts and memos, must be precise, persuasive, and meticulously formatted. Microsoft Word serves as an indispensable tool for lawyers for drafting, editing, and refining legal documents as documents are the threads that weave the fabric of legal work. By mastering Microsoft Word’s advanced features and shortcuts, legal professionals can transform their document creation process and significantly improve productivity in their daily practice.
Here is an overview of what this article covers:
- Capitalisation shortcuts
- Automatic Saving at Intervals
- Default Pasting Command
- Document Inspector
- Merge Documents
1. Capitalisation Shortcuts
Microsoft Word offers a convenient capitalisation tool that allows users to instantly change the casing of selected text. This feature provides five different modes of capitalisation and can be found in the “Home” ribbon.
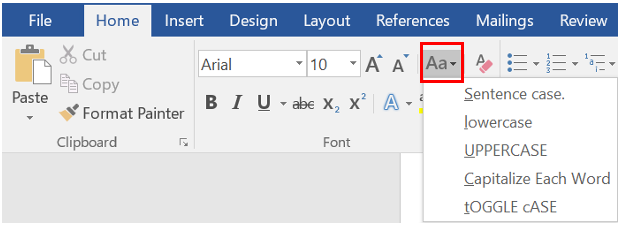
To use it, simply highlight the text you wish to change, navigate to the “Home” ribbon, and select one of the capitalisation options. The capitalisation of the text will be updated thereafter.
Pro Tip: Selecting the “tOGGLE cASE” option inverts the existing capitalisation of each letter.
2. Automatic Saving at Intervals
To mitigate the risk of data loss, you can utilise a Microsoft Word feature that automatically saves documents at regular intervals. This automatic saving feature serves as a safeguard, thereby providing peace of mind while working on important documents.
You may enable this feature by navigating as follows: “File” -> “Options” -> “Save”.
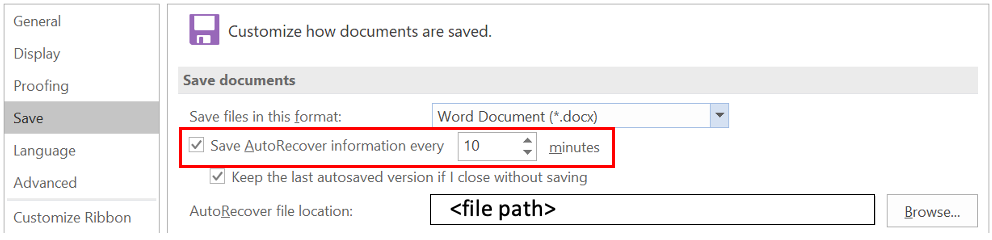
Ensure that the option “Save AutoRecover information every [ ] minutes” is selected and adjust the interval according to your preference.
Pro Tip: When determining the duration of these intervals, you may wish to note that a longer interval may enhance Microsoft Word’s performance, while a shorter interval may minimise the amount of work lost in the event of an unexpected shutdown of Microsoft Word or your device.
In the event of an unexpected shutdown, you may be able to recover your progress by opening the file and navigating to the “File” tab in the top ribbon. Under “Manage Document” at the bottom, you will find all the versions of the document that have been saved automatically. Select the version you wish to recover and it will open a temporarily recovered file in ‘read-only’ mode. This will allow you to verify the version you wish to restore.
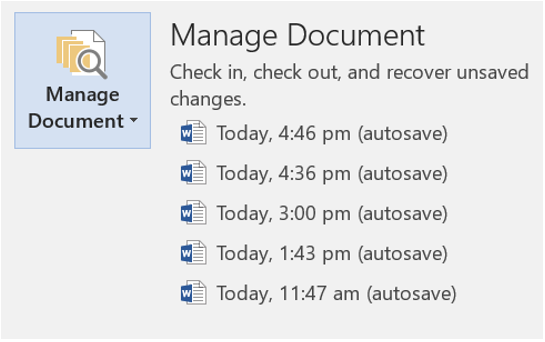
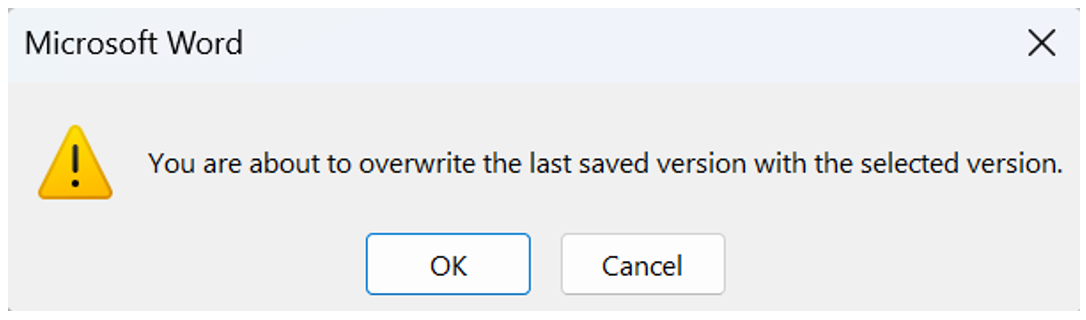
Should you wish to recover the file, click on the “Restore” button at the top of the document. If you choose an older version of your document click “OK” when the overwrite warning appears in a dialogue box.

3. Default Pasting Command
Pasting content from various sources is a common practice for lawyers. However, the default paste function often results in inconsistent formatting, which can disrupt a document’s formatting consistency. To maintain formatting integrity, Microsoft Word allows you to set the default paste command to “Keep Text Only”, thereby removing all formatting from the copied text and reducing interference with the document’s overall formatting.
To utilise this feature:
- Under the “Home” tab in the ribbon, click the arrow below “Paste” and select the “Set Default Paste…”.
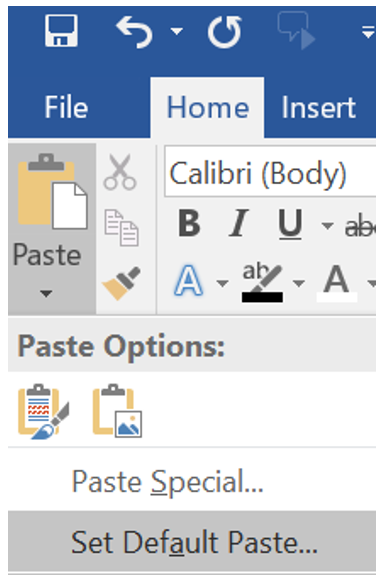
- A dialogue box will subsequently appear under the section titled “Advanced”. Scroll down to the “Cut, copy, and paste” header.
- “Pasting between documents when style definitions conflict” refers to situations where content copied from one Microsoft Word document has a style that differs from the document where the text is being pasted.
- “Pasting from other programs” refers to situations where the content to be pasted is copied from another program, such as a web browser.
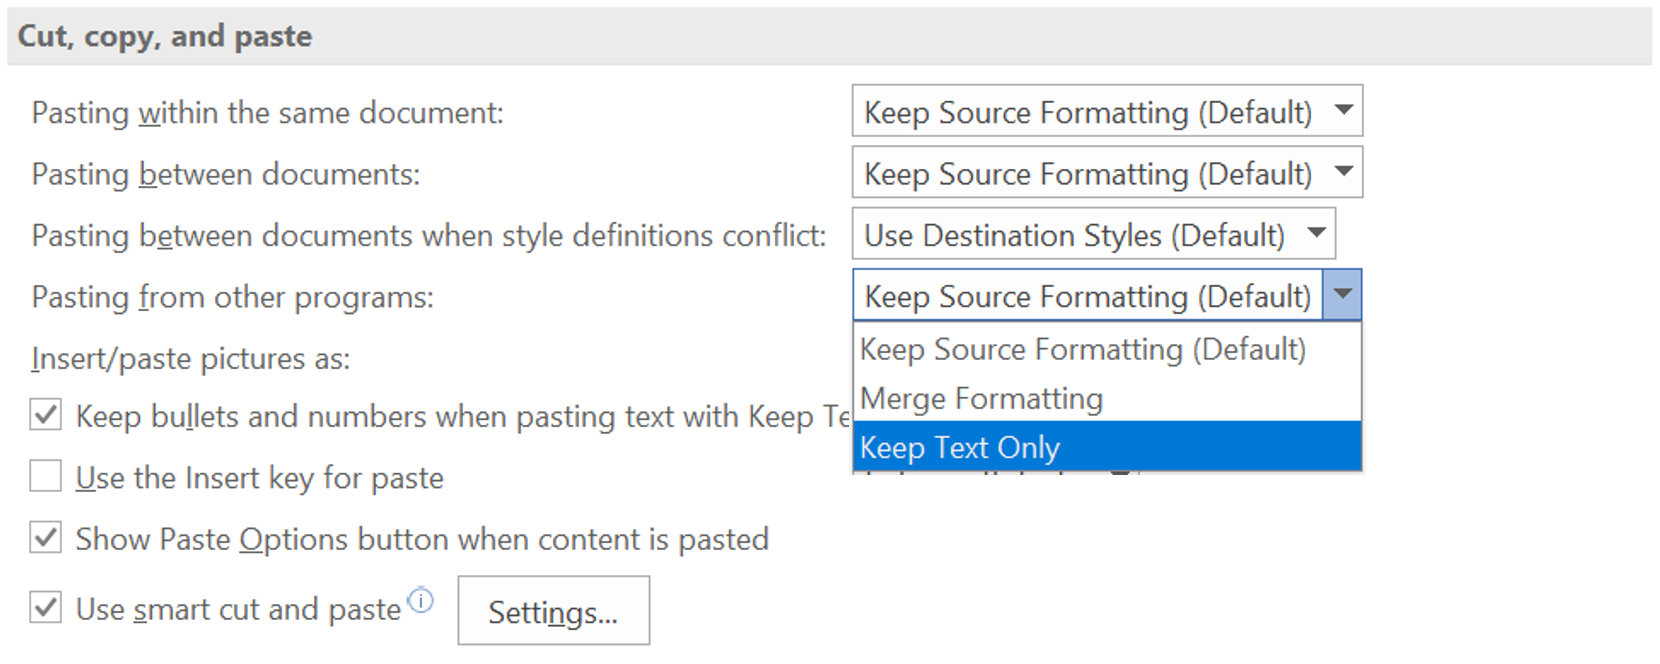
- Click the dropdown boxes next to the different pasting options and select “Keep Text Only”.
- Once done, click “OK” at the bottom right to apply your changes.
Pro Tip: Keep the “Use smart cut and paste” option (refer to the last option in the screenshot above) selected if you would like Microsoft Word to automatically perform tasks such as adjusting the word and sentencing spacing in the text being pasted.
4. Document Inspector
Microsoft Word’s Document Inspector assists with the examination of document contents. This tool is invaluable in assisting to identify and remove hidden data, personal information, and any revision marks present in the document that you may wish to leave out from the final drafts of your documents. By using the Document Inspector tool, you will be able to scan your document for various types of metadata (such as the identity of the creator of the document and the revision history of the document) and choose to remove them, ensuring your document preserves anonymity and is free of any sensitive or hidden information.
Pro Tip: It is advisable to first create a copy of the original document, and to subsequently use Document Inspector on that copy, as it may not always be possible to restore the data that the Document Inspector removes.
To utilise the Document Inspector:
- Open a copy of the original document.
- Navigate to the “File” tab in the ribbon and find “Check for Issues” under “Info”. Choose “Inspect Document”.
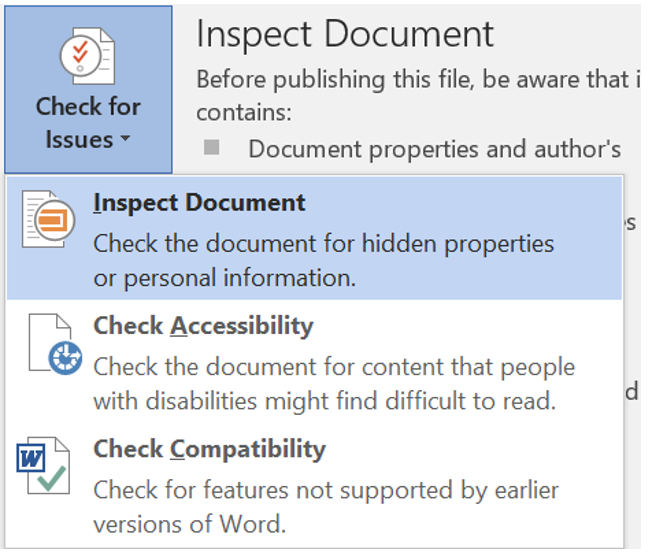
- In the dialogue box that appears, select the content you would like to be inspected and click “Inspect”.

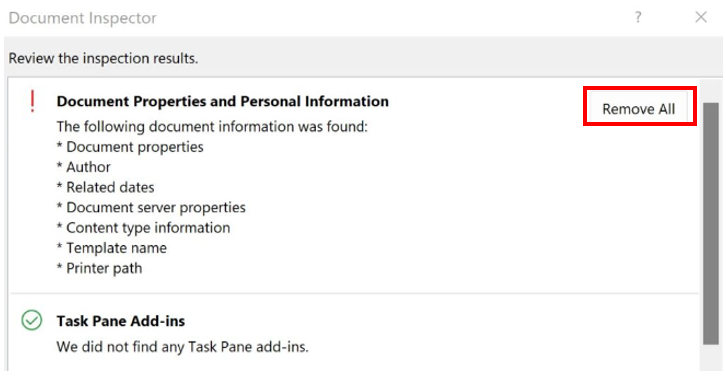
- The inspection results will identify the issues present in the document. Select “Remove All” to resolve the identified issues.

- In particular, in order to clear metadata from your document, select “Remove All” under the “Document Properties and Personal Information” section.
5. Merge Documents
Managing multiple versions of a document can be challenging, particularly when there are numerous edits made by different authors to the document. Microsoft Word offers a solution by enabling users to combine various document revisions, seamlessly merging all edits and ideas into a single document without the need to manually combine different authors’ inputs.
To utilise this feature:
- In the top ribbon, navigate to “Review” -> “Compare” -> “Combine”.
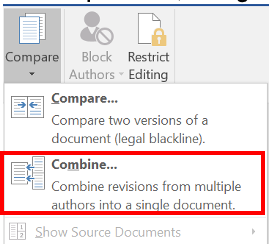
Pro Tip: If you wish to merely view the changes made between two documents but do not wish to combine these changes, select “Compare” instead.
- A dialogue box will appear, giving you the option to choose two documents to be combined into a single document. Select the original document (e.g. the document you had prepared for your client’s review) and the revised document (e.g. the document you received from your client with their comments and mark-ups) under the respective fields. In the box next to “Label unmarked changes with”, you can type a name or keyword to easily identify who proposed the change(s).
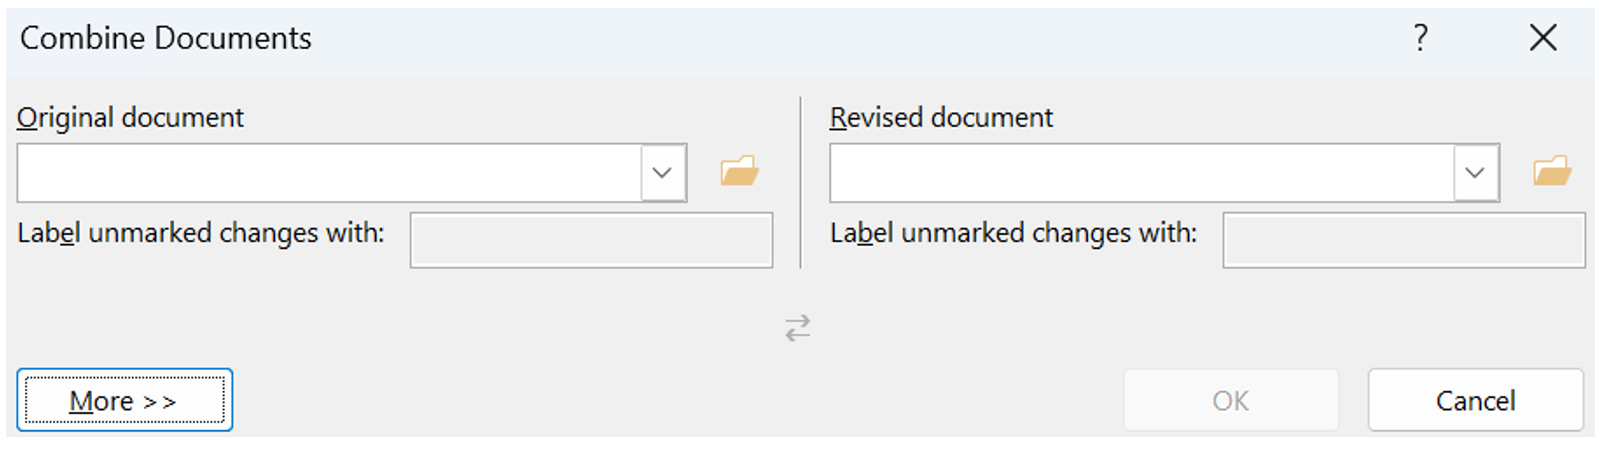
- You can click “More >>” to view more options for combining the documents and to choose where to merge the documents using “Show changes in”.
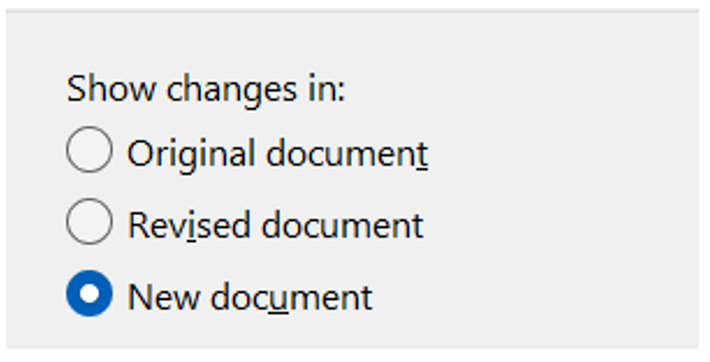
- Once done, click “OK” at the bottom.
Following the above steps will create a combined document based on your selected options. You will notice that the document generated will be divided into three sections: the leftmost section will display the revisions made, the middle section will show the combined document, and the rightmost section will be split into two to show the original document at the top and the revised document at the bottom.
Conclusion
If you enjoyed this article, stay tuned for more from the “Technology Basics” series, brought to you by the Law Society of Singapore’s Representation and Law Reform department.
For feedback on this article and/or suggestions for topics this series can cover, please email us at [email protected].
The authors are grateful to Mr. Astin Tay Wee Loon’s contributions to this article during his internship with the Law Society.