


Technology Basics – Part 4: Connecting with Clarity
Mastering Zoom Like a Pro
Welcome to the fourth instalment of the “Technology Basics” series, brought to you by the Law Society’s Representation and Law Reform department. This series aims to offer lawyers practical tips on how to make the most of your technological tools in your daily practice. Read Part 1 on Microsoft Outlook (Taming the Inbox) here, Part 2 on Microsoft Word (Commanding the Content) here, and Part 3 on Microsoft Teams (Collaborating with Confidence) here.
This article explores Zoom, a video communication platform widely used for both personal and professional virtual meetings. Zoom supports a variety of modern business needs from one-on-one calls and team chats to large webinars, offering features like High-Definition video and audio, screen sharing, breakout rooms, and cloud recording. Its intuitive interface helps organisations stay connected, productive, and adaptable in remote and hybrid work environments.
Note: The features discussed in this article are based on the Zoom Workplace Pro and/or Work plans using the desktop application, which require a paid enterprise subscription. These features may not be available and/or may appear differently on the free, browser-based, and/or personal versions of Zoom.

Introduction
In legal practice, where time is often of the essence, clear and timely communication is critical for effective collaboration among lawyers, support staff, and clients. Zoom provides a reliable and secure video conferencing platform that enables legal professionals and their teams to conduct and/or attend virtual meetings, client consultations, internal briefings, and even court hearings.
Equipped with features that support remote collaboration – whilst enhancing efficiency, professionalism, and confidentiality – Zoom has evolved into an essential tool for the modern law firm in Singapore.
This article covers practical tips for using Zoom effectively across three key stages:
- Pre-Meeting Preparations – Lighting, Naming, Audio, Video Backgrounds, and Waiting Rooms
- During the Meeting – Viewing Options, Pin Function, Screen Sharing, Breakout Rooms, and Keyboard Shortcuts
- Post-Meeting – Recordings and AI-Generated Meeting Summaries
1. Pre-Meeting Preparations
Lighting
Good lighting is key to presenting yourself professionally during Zoom meetings. It ensures your facial expressions and non-verbal cues are clearly visible — an important factor in building trust and engagement, especially during client consultations or court hearings.
To achieve optimal lighting:
- Use natural light from a window or position a soft light source in front of you.
- Avoid harsh backlighting or overhead lights, which can cast shadows and reduce video clarity.
Pro Tip: Use Zoom’s “Preview” feature before joining a call to check your lighting and make adjustments as needed.
Naming
First impressions matter — especially in professional settings like client meetings or virtual court hearings. One of the first things others will notice in a Zoom call is your display name, which can set the tone for the interaction.
For virtual court hearings, it is important to follow the naming conventions specified in the court notice or correspondence you received. In general, your display name should include your title and full name, unless otherwise instructed.
To update your default name across all meetings:
- Go to Home in the Zoom desktop application.
- Click the Settings icon
 (top right of the screen) > Profile > Edit my Profile
 - Update your name and click Save.
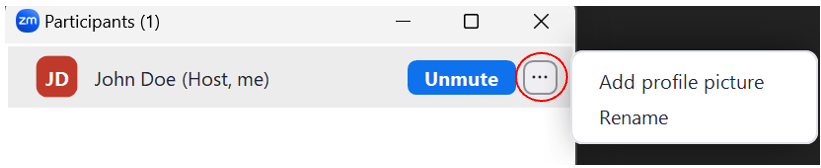
Pro Tip: To change your name after joining a meeting, click Participants at the bottom left of the screen. Locate your name, click the “…” icon, and select Rename as shown below.
Audio
Clear audio is essential for effective communication. Background noise, echo, or poor microphone quality can lead to miscommunication or missed information.
By default, Zoom applies a moderate background noise suppression to meetings. You can adjust this setting manually to a medium level (to reduce common ambient noises) or to a high level (to reduce louder sounds such as background conversations), as shown below.

To test your audio before a meeting:
- Join a test meeting by visiting https://zoom.us/test.
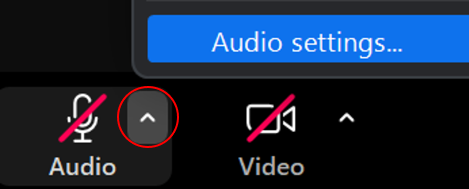
- Alternatively, click the arrow next to the Audio button in Zoom > Audio Settings > Audio Profile, as shown below, to choose your preferred settings.
Pro Tip: Quickly mute or unmute yourself by pressing and holding the spacebar during a meeting. When held down, Zoom will temporarily unmute your microphone and you will see the pop-up below.

Video Background
Maintaining a clean and professional background is essential when meeting clients and when appearing before the Court. A tidy, uncluttered space keeps the focus on you and the conversation, rather than any distractions in your surroundings. You should ensure that any personal or confidential items are removed from view.
If you prefer not to show your physical environment, Zoom allows you to use a virtual background. To set this up before a meeting, go to Settings > Virtual Background.
Pro Tip: If you are not keen on a full virtual background but still require privacy, use the ‘Blur’ feature to subtly obscure your surroundings while keeping your image clear.
Waiting Room
Zoom’s “Waiting Room” feature acts as a virtual “lobby”, allowing you to screen participants before admitting them into the meeting. This adds an extra layer of security and gives you time to prepare, which is particularly useful when external parties are involved.
To enable the “Waiting Room” feature for your meeting, go to Home > Schedule > Meeting Security > Waiting Room.
Pro Tip: A thoughtfully designed waiting room creates a strong first impression, particularly in client-facing meetings. You can customise it by adding your organisation’s logo, a welcome message, or even a short video.
To customise your Waiting Room, navigate to Account Management > Account Settings > Security > Waiting Room > Customise Waiting Room Layout.
2. During the Meeting
Viewing Options
Zoom offers three main viewing options to suit different meeting formats and preferences:
- Speaker View: Automatically highlights and enlarges the video of the active speaker. This is ideal for meetings with three or more participants where focus on the current speaker is important.
- Multi-Speaker View: Enhances engagement by enlarging the video tiles of multiple active speakers. This view is available when there are at least five participants in the meeting.
- Gallery View: Displays all participants in a grid layout, allowing you to see everyone at once. This is the default view when fewer than five participants are present.
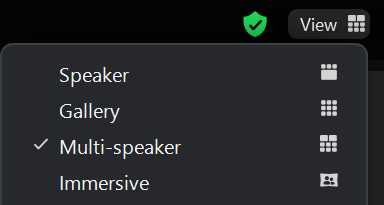
To switch between views during a meeting, click View  in the top-right corner of the Zoom window, as shown below, and select your preferred option.
Pin Function
In some Zoom meetings, you may want to keep a specific participant — such as a Judge during a court hearing — visible on your screen at all times. The Pin feature allows you to do just that, ensuring their video remains in focus regardless of who is speaking. This feature is especially useful in formal or structured meetings where consistent visual focus is important.
To pin a participant:
- Hover over their video tile.
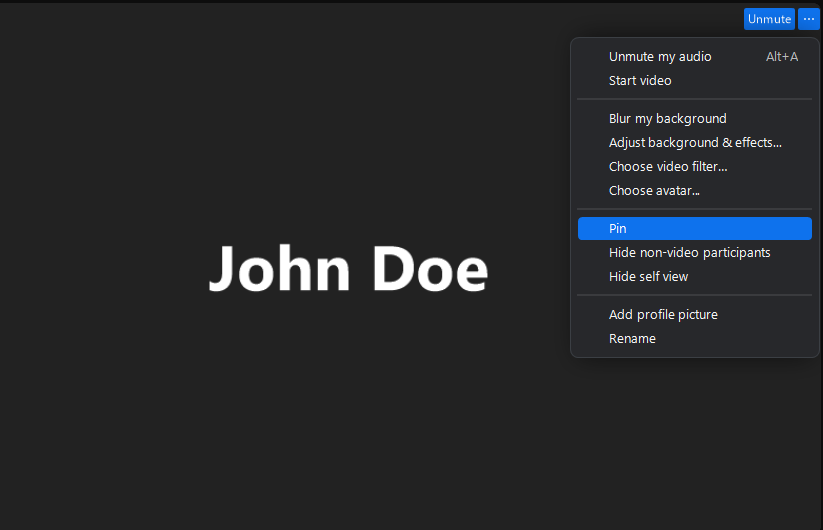
- Click the three dots (⋯) in the top-right corner.
- Select Pin from the menu.
Screen Sharing
Screen sharing is a key feature in Zoom, especially useful for presenting documents, affidavits, or other materials during meetings.
To use the screen sharing function:
- In the meeting controls toolbar at the bottom of the screen, click Share

- The screen sharing window will appear.
- Choose between the Screens or Documents tabs at the top.
To share your entire screen, click the Screens tab. This mode of sharing is ideal if you are using a second monitor or need to switch between multiple applications. You can share up to four screens simultaneously.
To share a specific file from your computer, click the Documents tab. This mode of sharing is suitable for those who wish to keep other windows private.
Pro Tip: Use Zoom Whiteboard or Zoom Docs for real-time collaboration on shared content.
Breakout Rooms
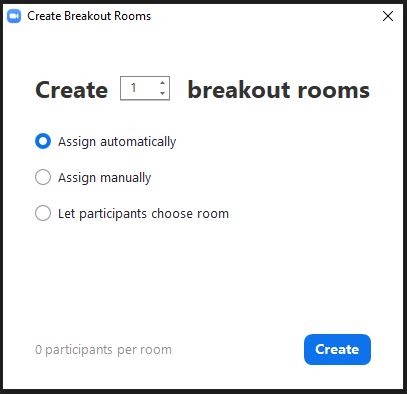
The “Breakout Room” feature allows you to divide participants into smaller groups in order to foster focused discussions in large meetings. This is particularly useful in legal settings, such as online mediation sessions, where private conversations between parties, lawyers, and mediators are required.
To create “Breakout Rooms” during a meeting:
- Click Breakout Rooms
 in the meeting toolbar.
 - Choose the number of rooms you want to create and how participants should be assigned:
- Assign automatically: Zoom evenly distributes participants across rooms.
- Assign manually: You select which participants go into each room.
- Let participants choose a room: Participants can select and join rooms on their own.
- Load pre-assigned rooms: Use previously saved room assignments.
- (Optional) Include co-host(s) in room assignments (this feature is disabled by default)
- Click Create to generate the rooms.
Useful Keyboard Shortcuts
Keyboard shortcuts enable you to perform common Zoom actions quickly and efficiently, helping you to stay focused and minimise distractions during meetings. Here are some handy shortcuts to keep in mind:
- Alt + V: Turn camera on/off
- Alt + A: Mute/unmute microphone
- Alt + F: Enter/exit full screen
- Alt + H: Display/hide in-meeting chat panel
- Alt + U: Display/hide participants panel
- Alt + Y: Raise/lower hand
3. Post-Meeting
Recordings
Zoom allows hosts and participants to record meetings either locally to their computer or to the cloud. Recordings can include video, shared content, audio-only files, chat messages, and closed captions. This feature is available to both free and paid users, though cloud storage limits depend on your subscription plan.
To enable recording of your Zoom meetings:
- Login to your Zoom account using the web portal (https://us06web.zoom.us/signin#/login).
- Navigate to Admin > Account Management > Account Settings.
- Click the Recording & Transcript tab.
- For local recordings, toggle Record to computer files on.
- For cloud recordings, toggle Cloud recording on.
- If prompted, confirm the change by clicking Enable or Disable.
Pro Tip: Use local recordings for higher quality. Cloud recordings are compressed, while local recordings retain higher resolution and audio quality, which is ideal for professional use.
AI-Generated Meeting Summaries
“Meeting Summary with Zoom AI Companion”, or the Zoom AI Companion for short, can automatically generate a meeting summary using AI technology. When enabled, it captures key discussion points and provides a concise recap after the meeting that can be shared with all meeting participants post-meeting.
To enable the Zoom AI Companion meeting summary function:
- During the meeting, click AI Companion
 in the in-meeting controls. A notification will appear to inform participants that the summary is being generated.
 - (Optional) To stop the summary generation at any time, click AI Companion again and select Stop AI Companion.
Once the meeting ends, the summary is finalised and can be shared via email or the Zoom Team Chat feature.
Pro Tip: Always consider privacy and confidentiality before enabling or distributing AI-generated summaries, especially in highly sensitive or confidential virtual meetings.
Conclusion
If you enjoyed this article, stay tuned for more from the “Technology Basics” series, brought to you by the Law Society of Singapore’s Representation and Law Reform department.
For feedback on this article and/or suggestions for topics this series can cover, please email us at [email protected].
The authors are grateful to Mr Lin Chii Hwa and Mr K Vickneshvara for their contributions to this article during their internships with the Law Society.